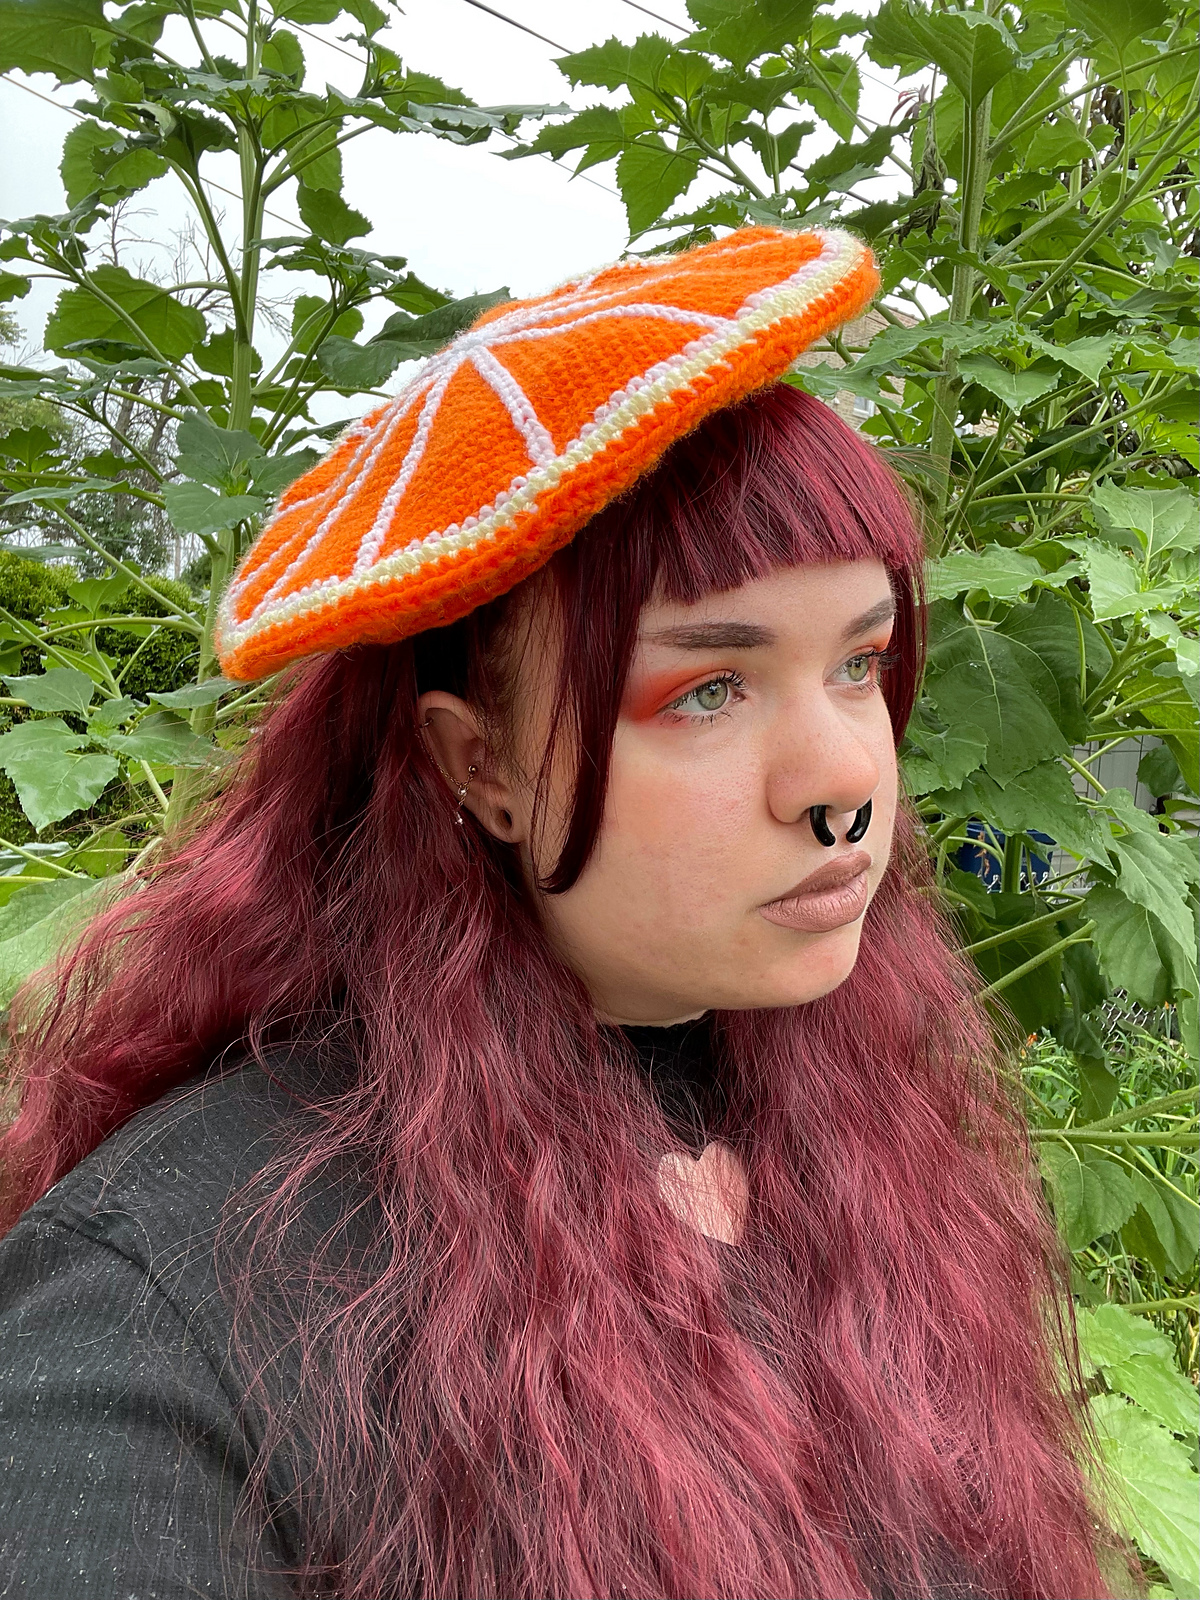
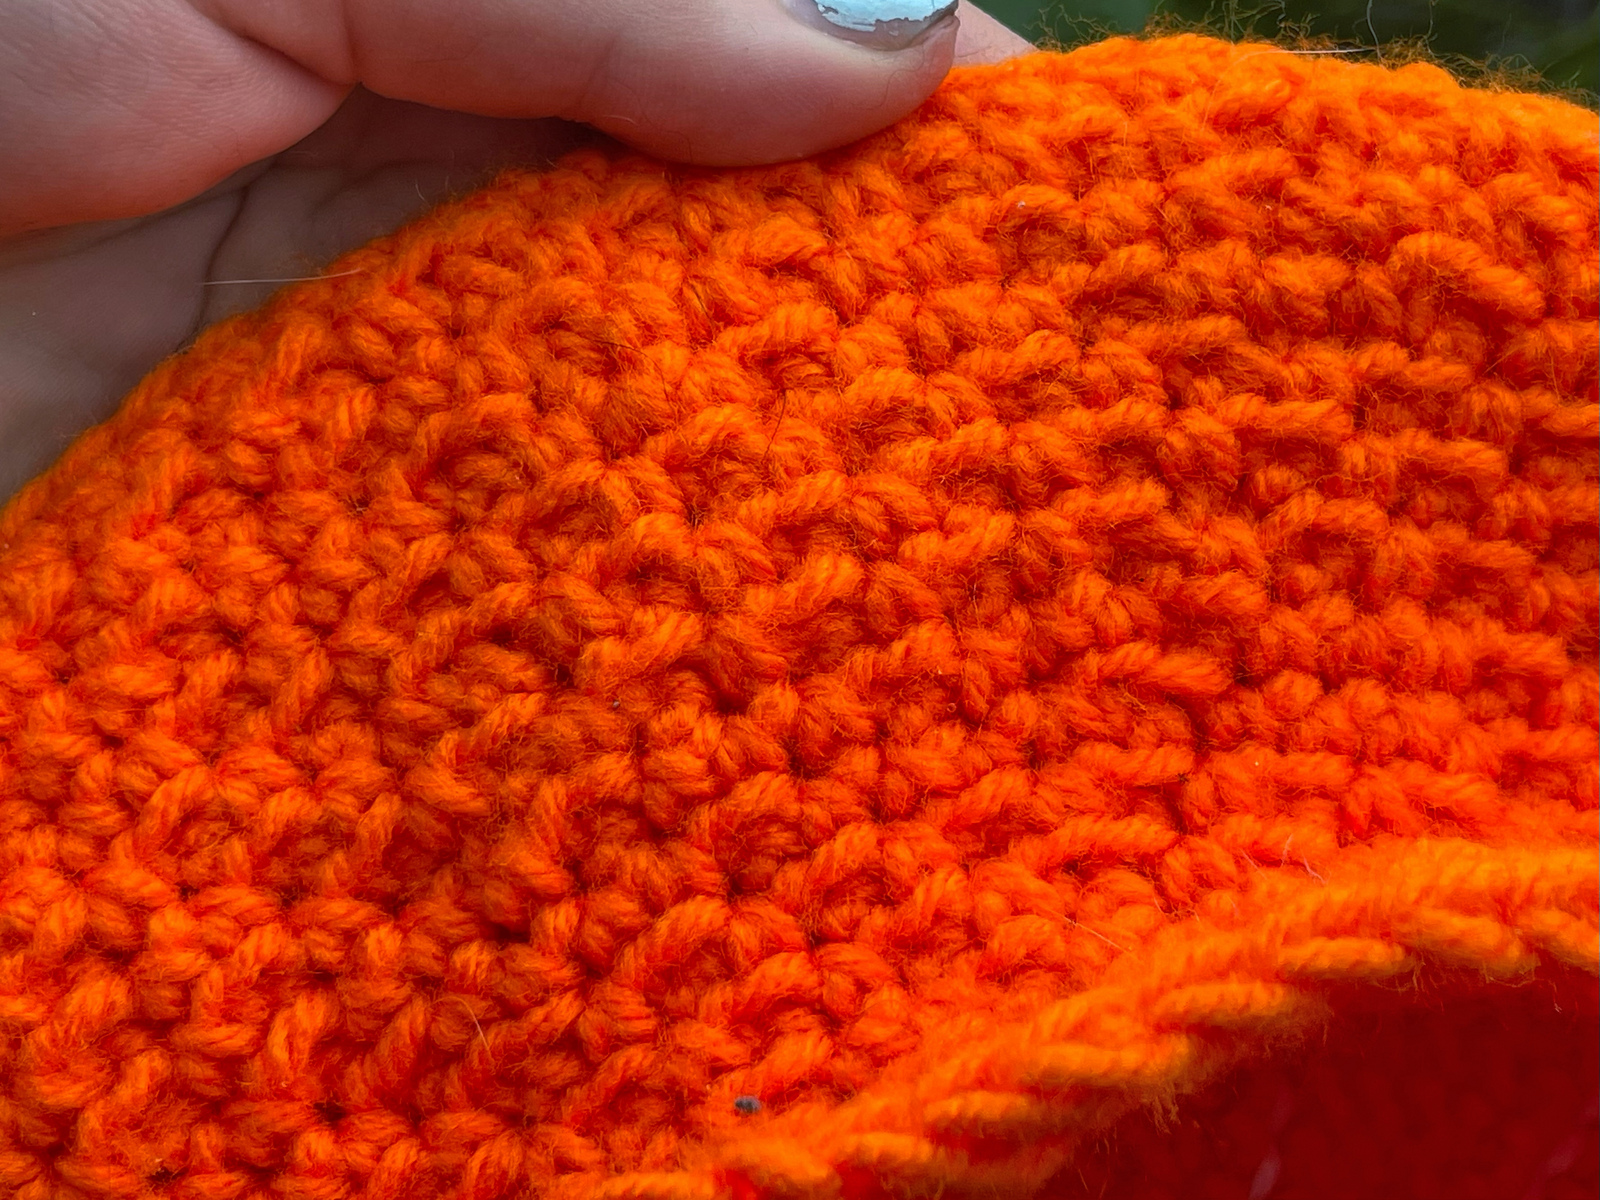
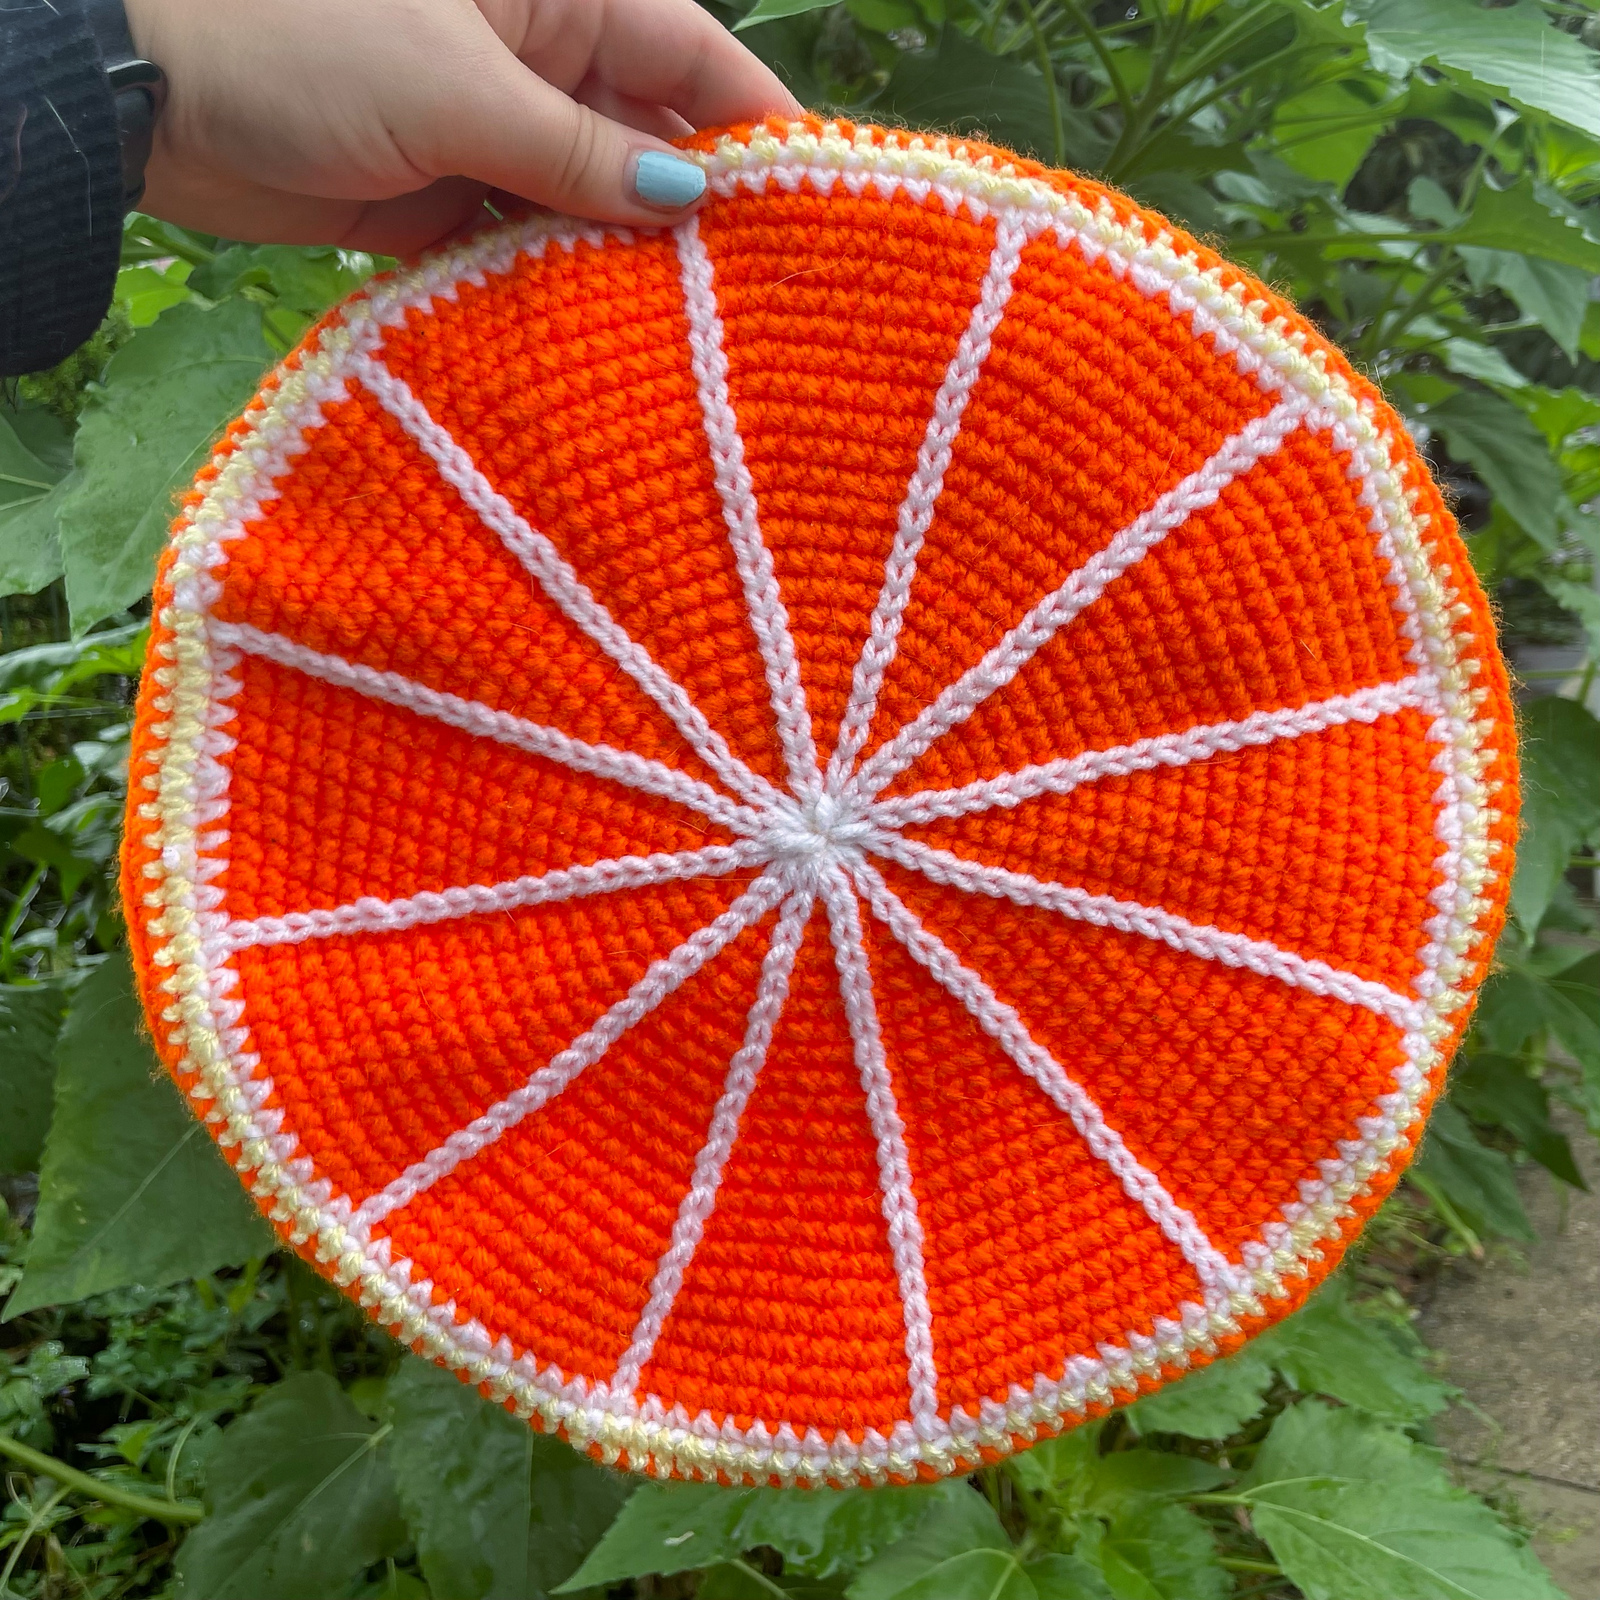
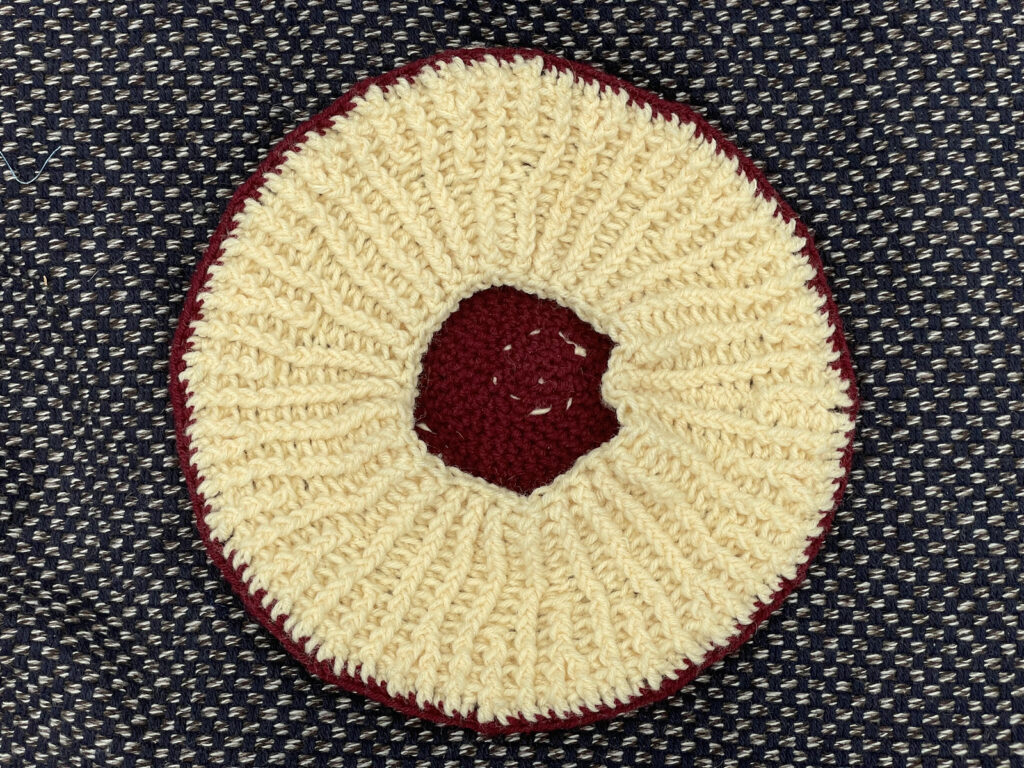
The Citrus Beret is based on, well, citrus! This hat features a segmented design reminiscent of the inside of a sliced citrus fruit, with a textured underside meant to evoke the peel.
This hat is worked in the round, some details are worked directly onto the top of the hat, no sewing required!
The Citrus Beret crochet pattern is now available on both Etsy and Ravelry!
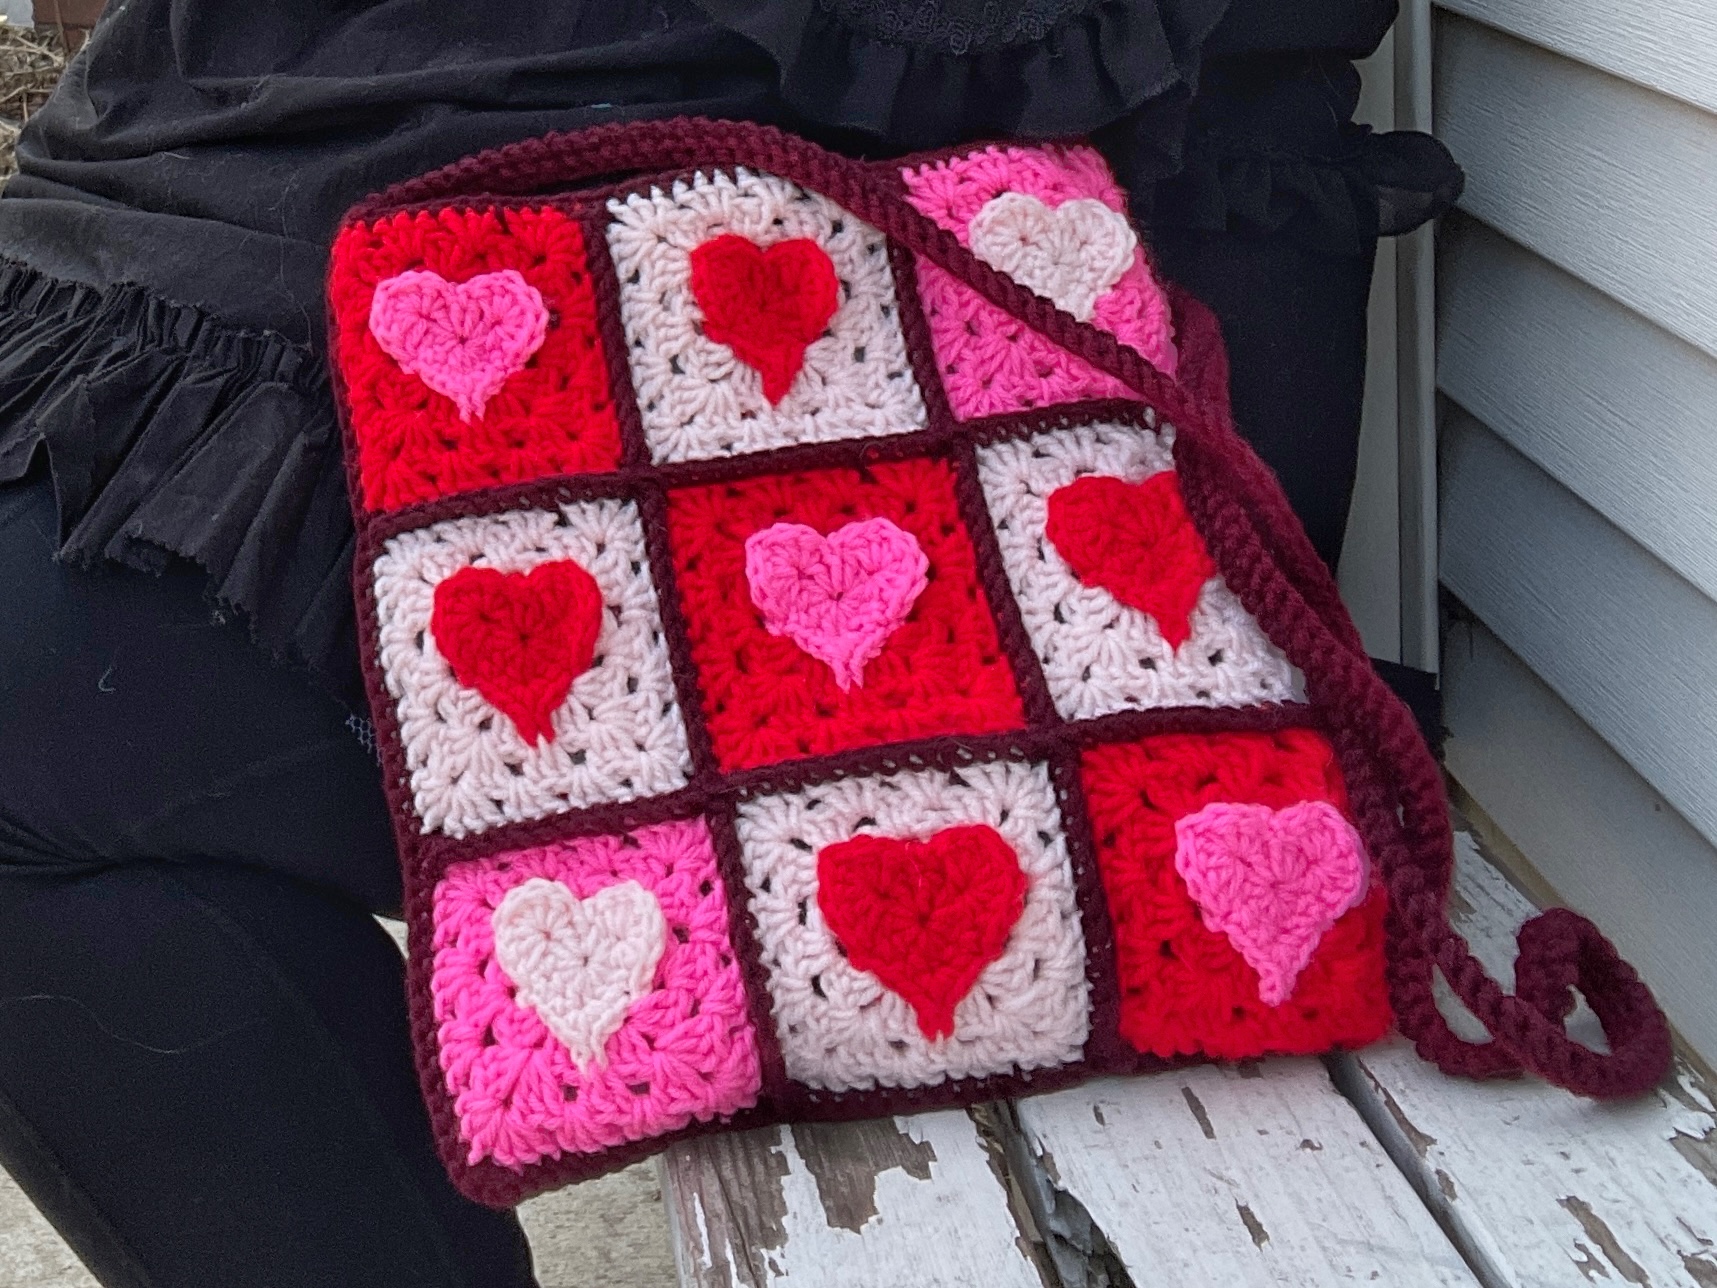
This bag is maybe a little late for this Valentine’s Day, or maybe it’s just really early for the next one? Whichever it is, it’s a fun, textured bag that’s a good use of some smaller balls of yarn!
The bag itself is made up of 18 granny squares crochet together, with a denim lining and a crochet strap. The pattern for it details how to make the granny squares, as well as how to put it all together and make a bag. A good thing about this pattern is the granny squares themselves can be used to make any other item that uses granny squares as a base!
Not only is this pattern up for sale on Ravelry, but it’s now up for sale on Etsy too! Please be sure to check it out!
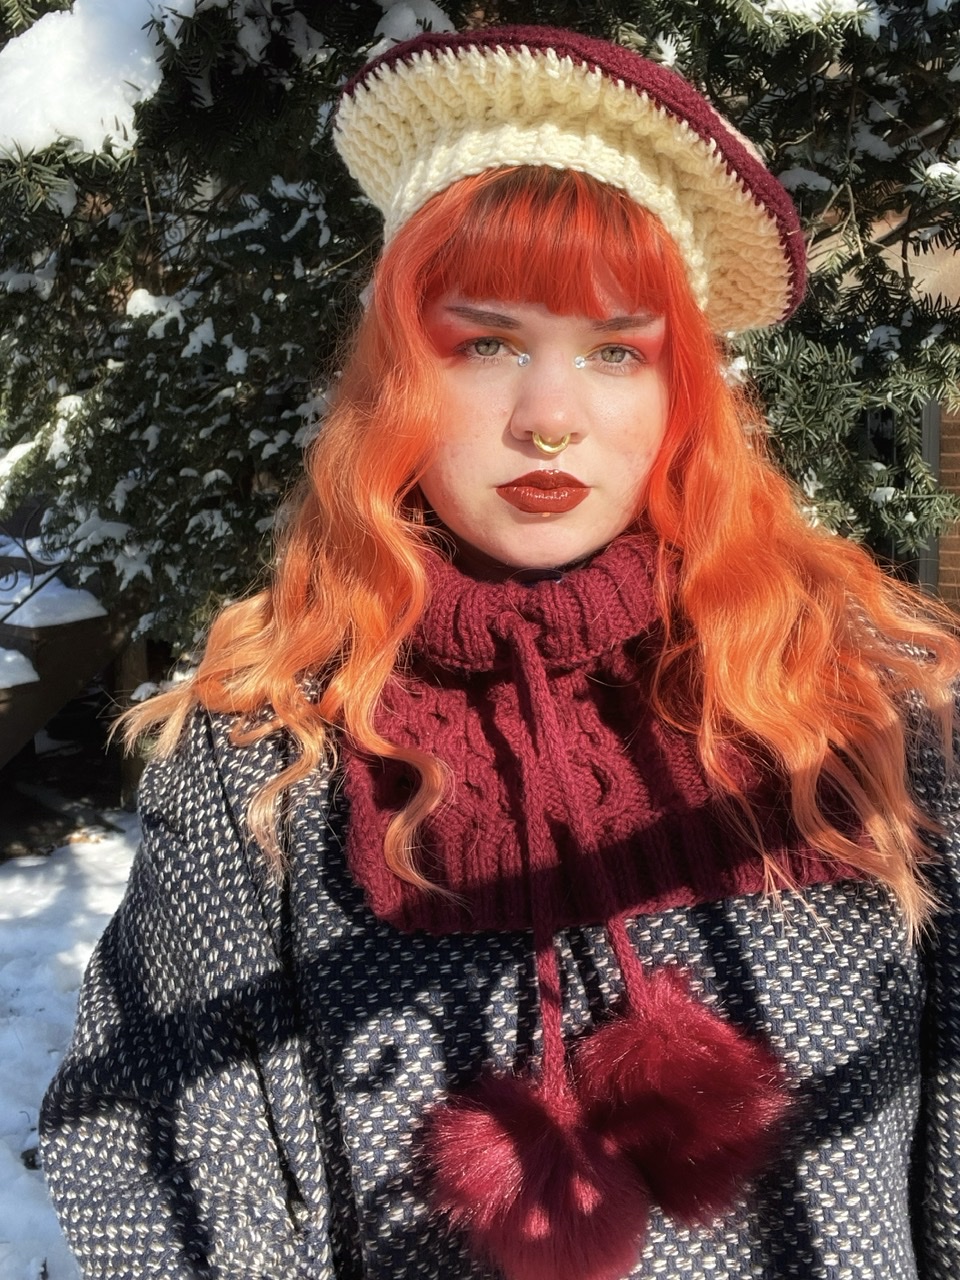
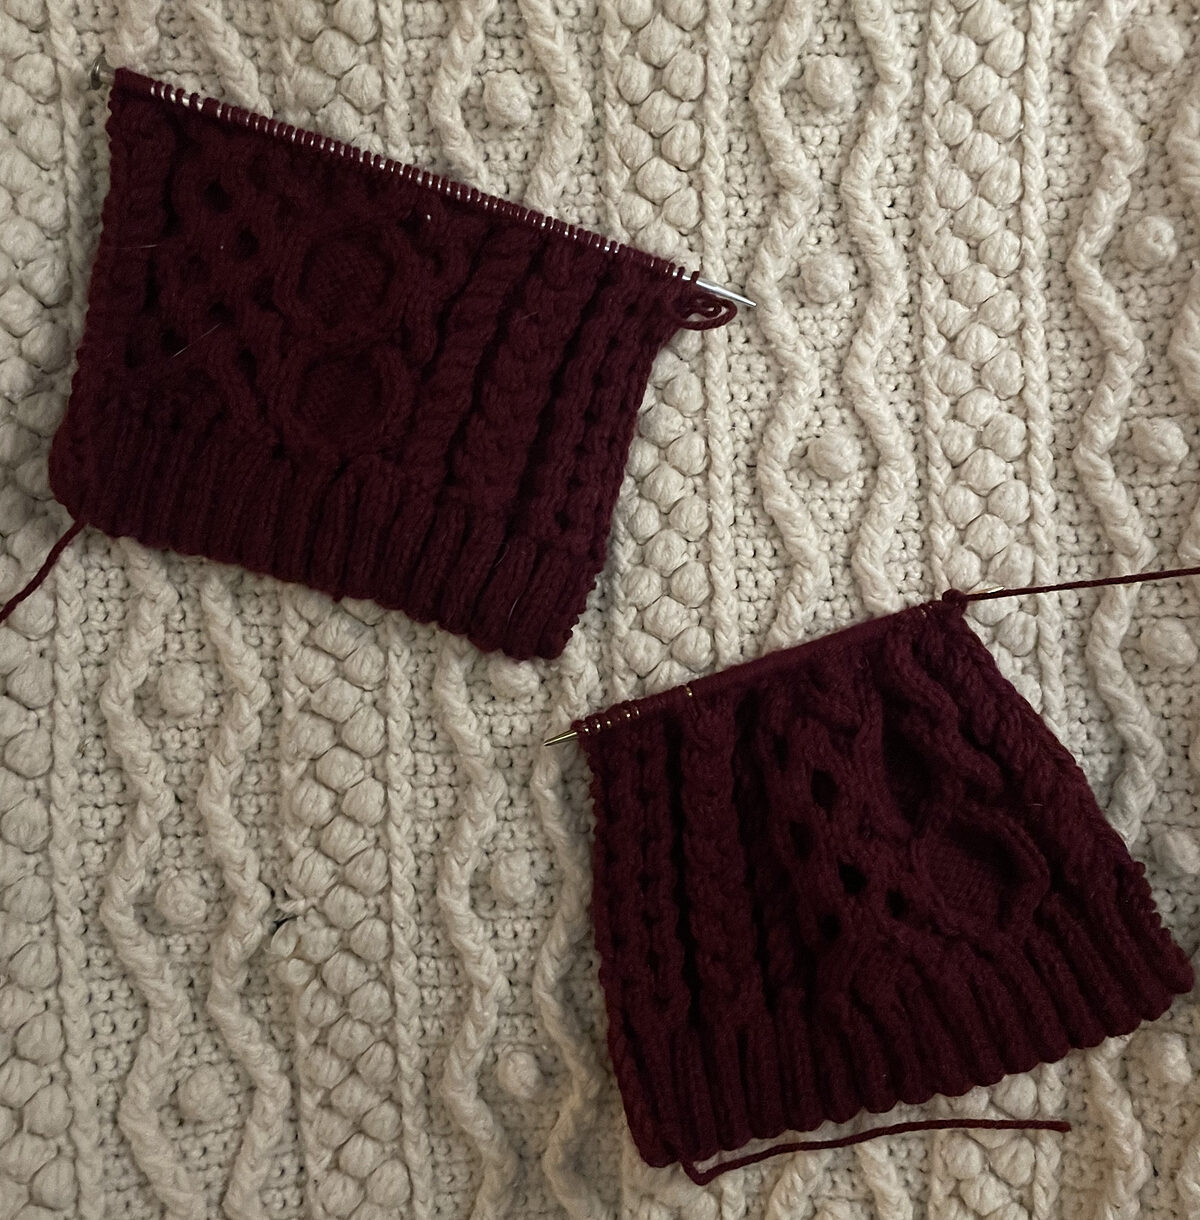
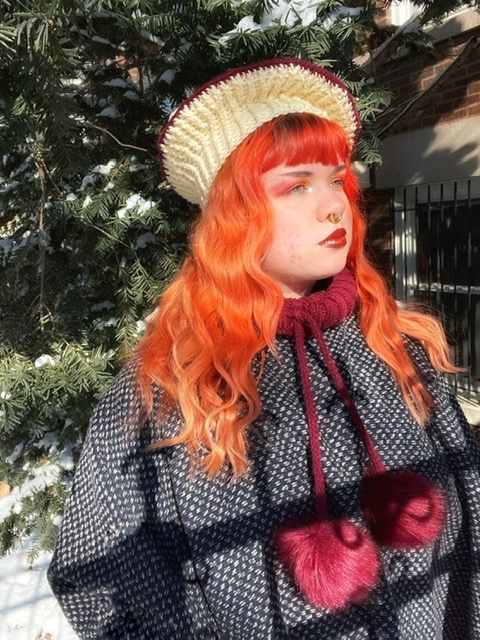
Recently I was lucky enough to be a test knitter for the Stellar Sailor Dickey pattern by Paul Haesemeyer. It’s definitely one I would recommend as a good weekend project – as long as you’re comfortable with charted cables, this is a pretty quick knit!
I worked mine up using my favorite yarn – Joann’s Big Twist. I did deviate just a touch by adding in some store bought pompoms instead of making my own, but the color was a perfect match! How could I resist?
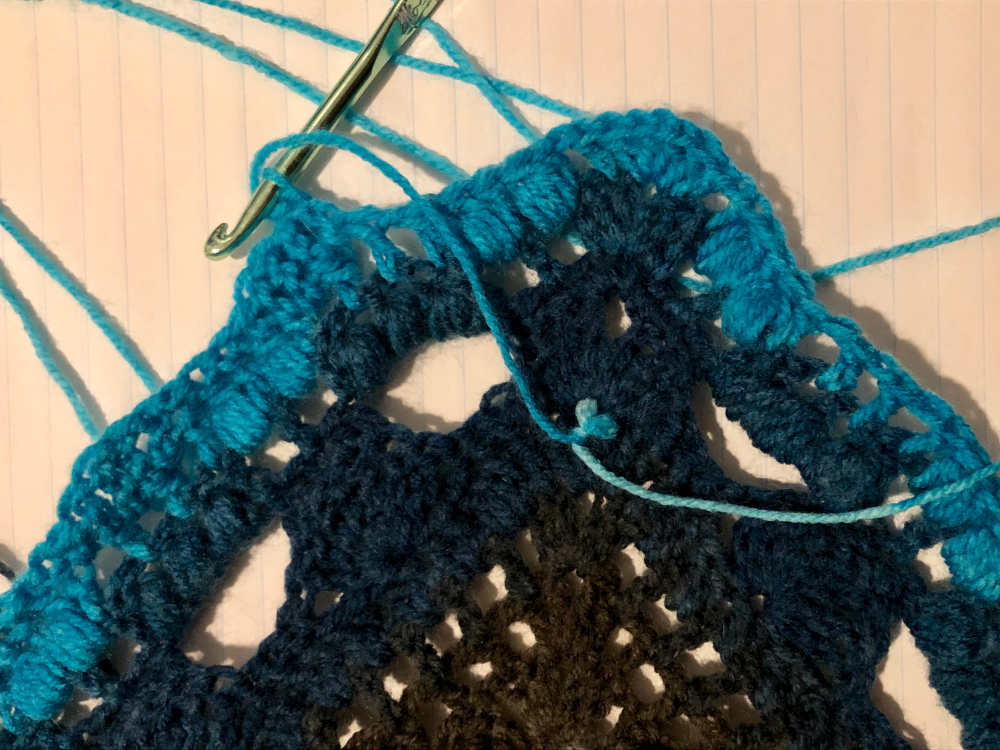
in progress, just before joining front and back to work in the round
One of the things that I really like about this piece is that it tucks in really smoothly. Wearing it outside a coat or jacket really shows off the cables, but wearing it tucked in does an incredible job of shielding from wind and snow. I’ve actually already started on a second one in brown, which is going to go to my roommate.
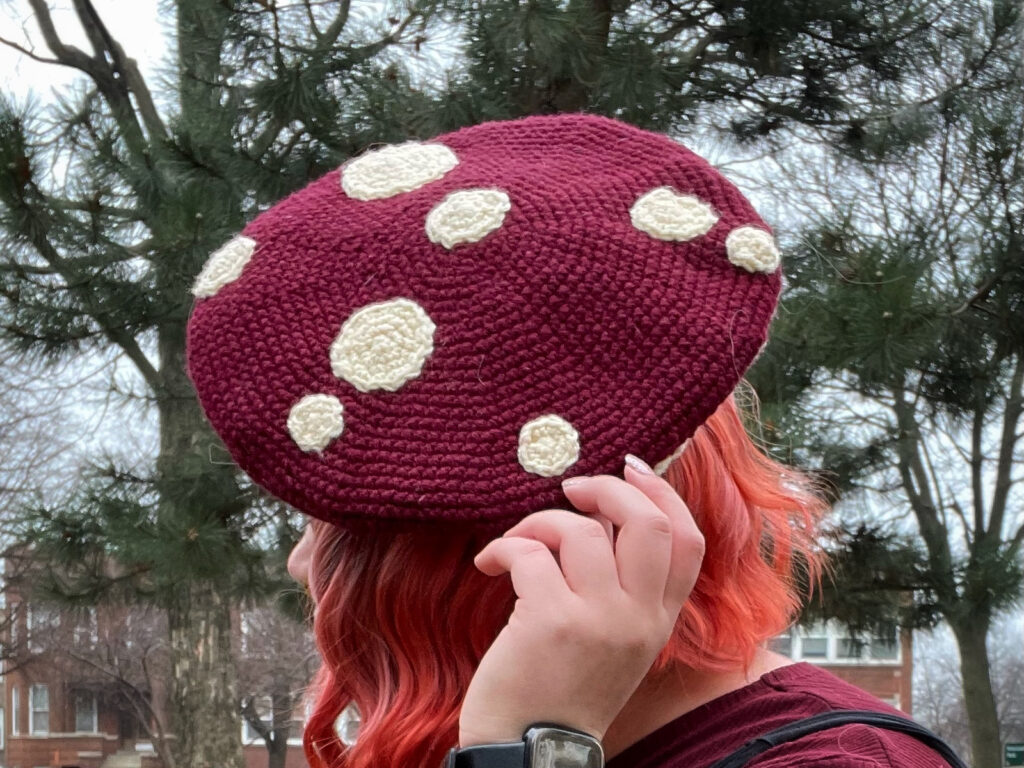
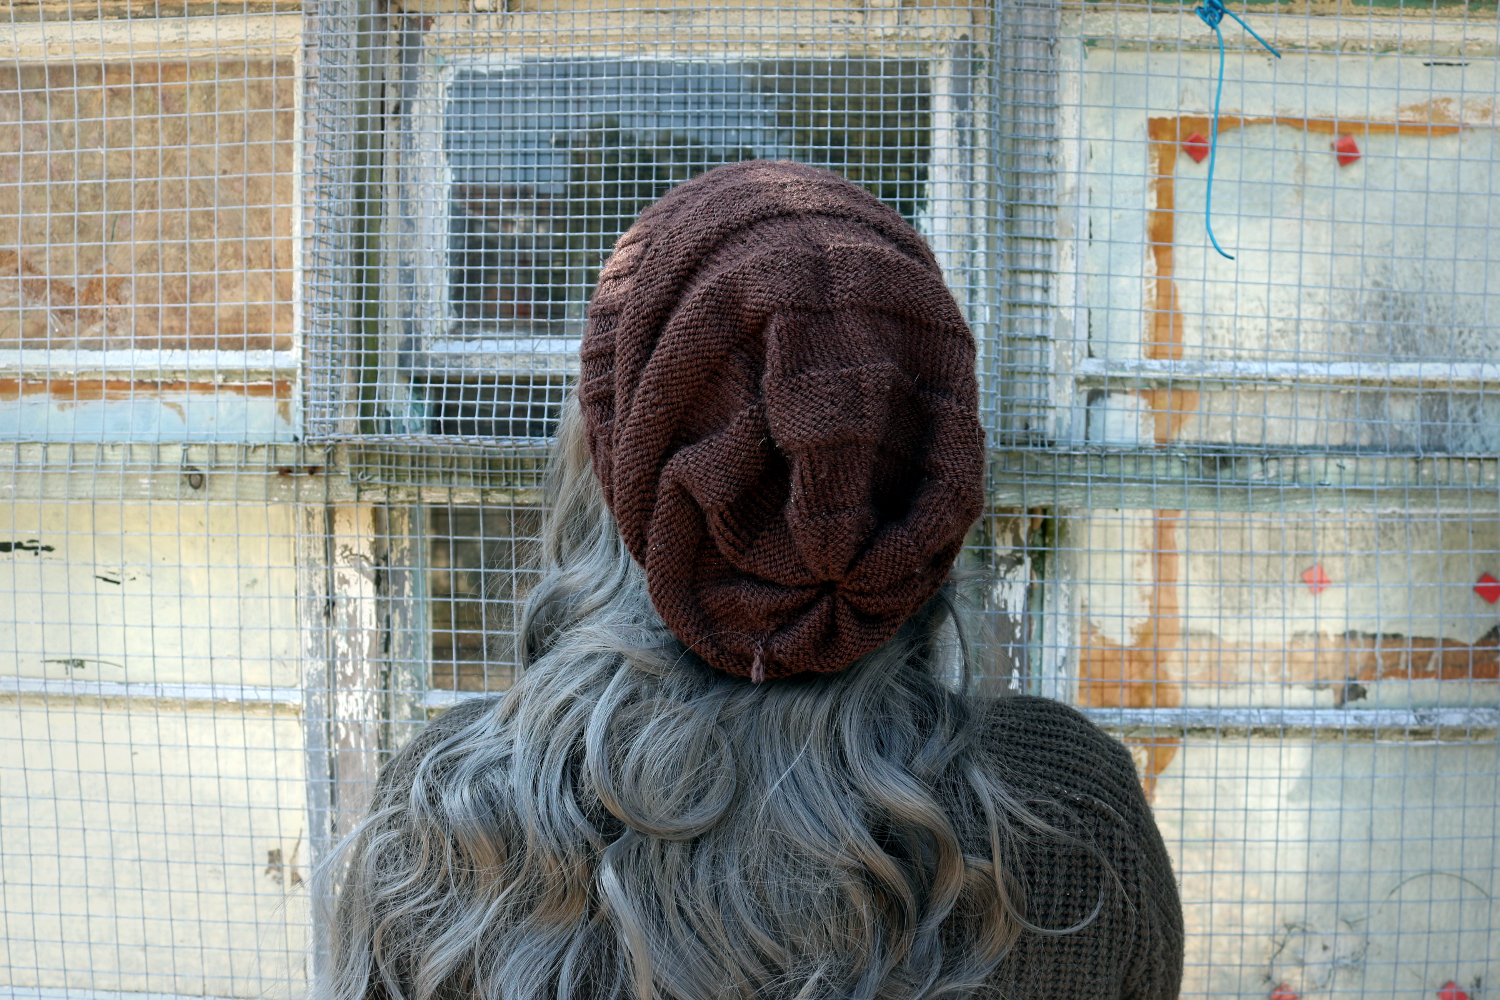
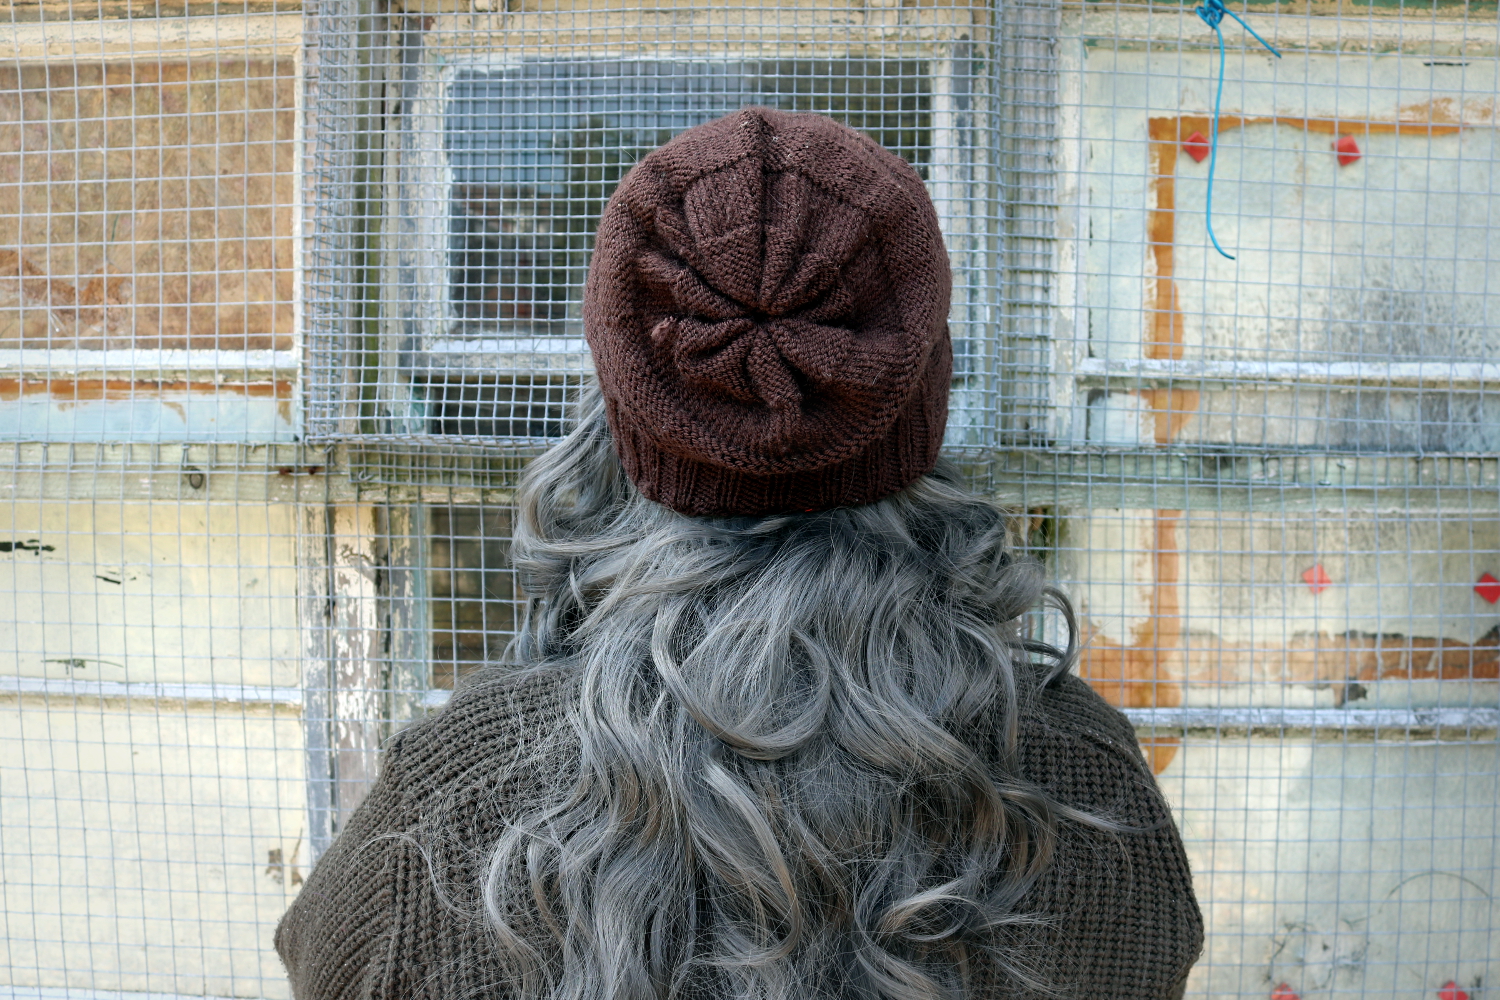
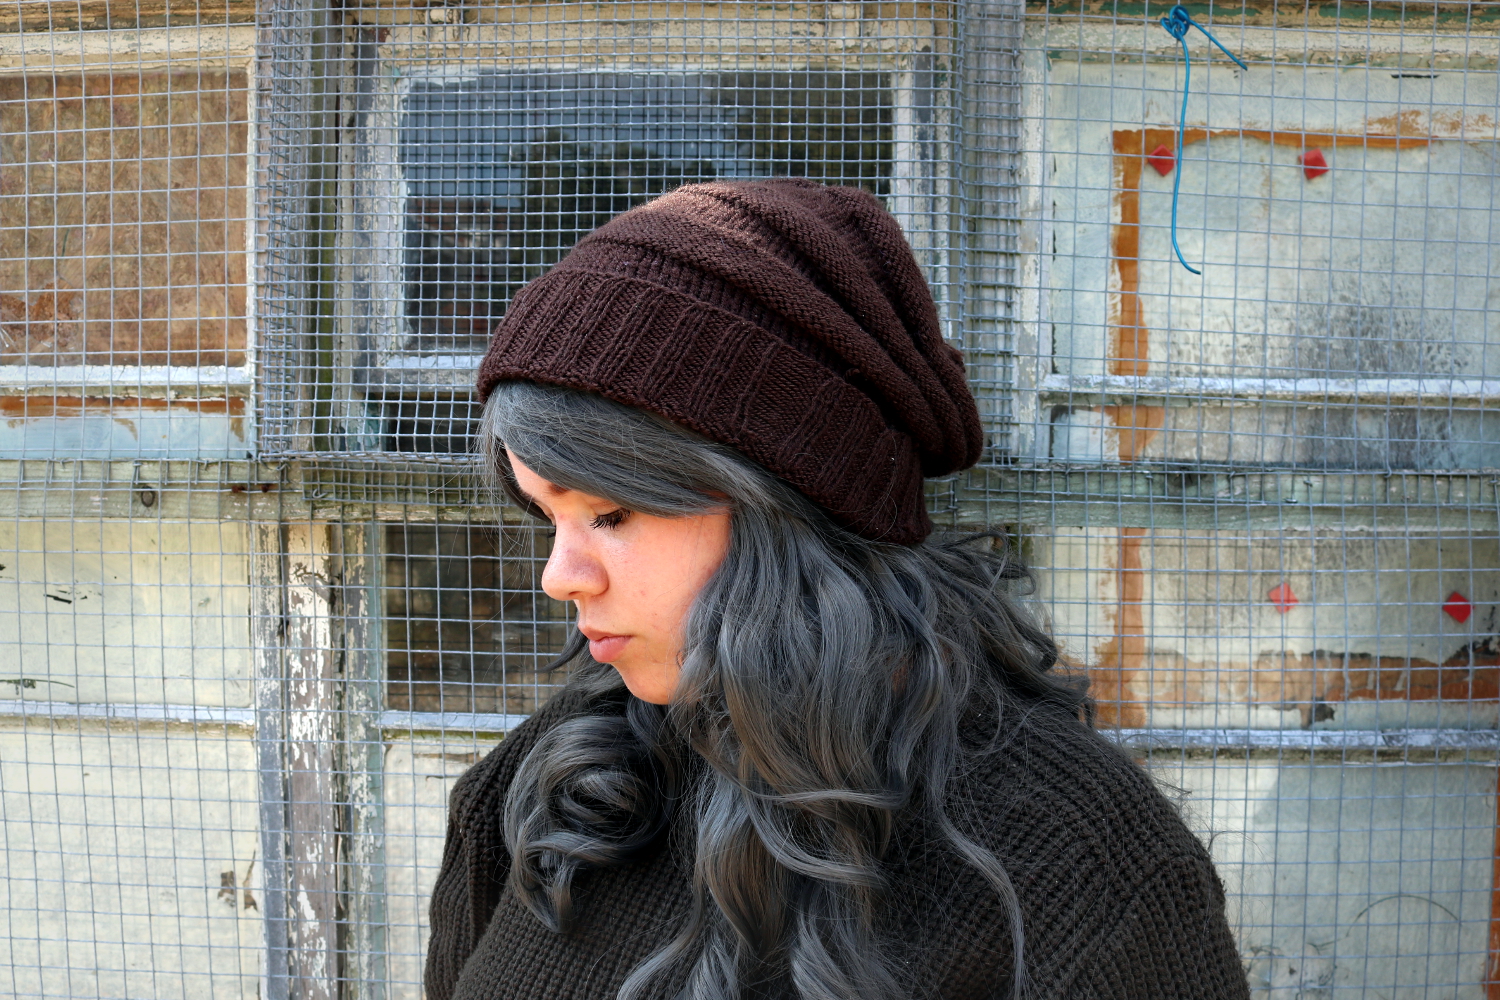
One of the last things I did in 2021 was make and design this Mushroom Beret. This is definitely in my top three designs of 2021. I made this hat using two colors of yarn and fairly simple stitches.
I’ve had the idea to make a Mushroom Beret for a while, but was only able to focus on this project recently. This beret’s design was inspired by amanita muscaria, or the fly agaric mushroom. One of the things that was super important to me was the look of the “gills” on the bottom of the hat. I managed to achieve what I was looking for in just a few days, and then patterned it and have uploaded it to Ravelry!
As always, thank you for reading, and be sure to share your projects when you’re done!
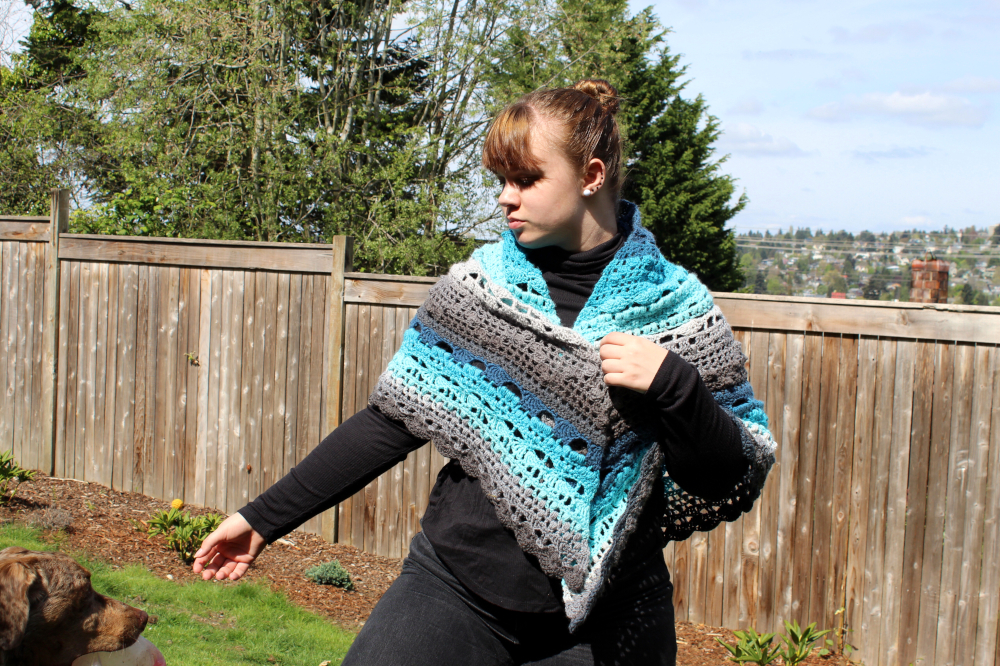
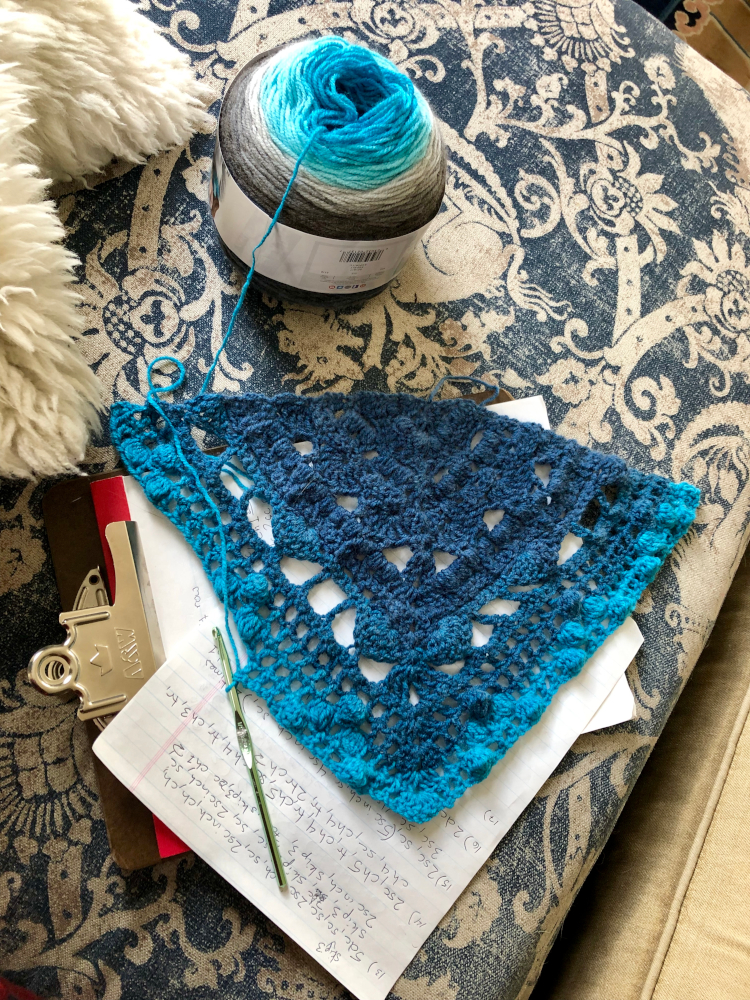
I picked up some Lion Brand Mandala yarn and immediately knew I wanted to make a shawl with it. The question was: which shawl? I searched for a while, but was unable to find any pattern that fit my specific vision, so I decided to design and make my own.
Over the course of about ten days, I turned my 2 skeins of Lion Brand Mandala in Spirit into a shawl and wrote up a pattern for it! This shawl pattern requires knowledge of basic stitches, as well as front post and back post stitches. The shawl uses about 1000-1200 yards of DK yarn and a size 5 mm (H) crochet hook Instructions for bobble and puff stitches are included. Scroll down to the bottom of this page for a link to purchase the pattern!
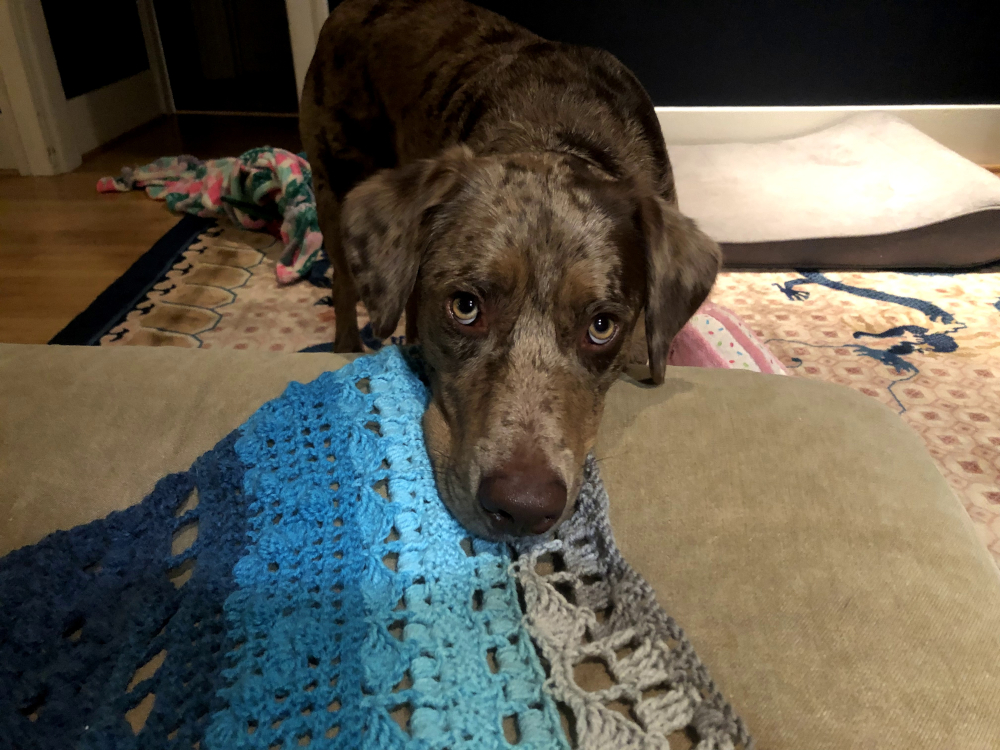
Jupiter would prefer if I didn’t put my crochet on his ottoman
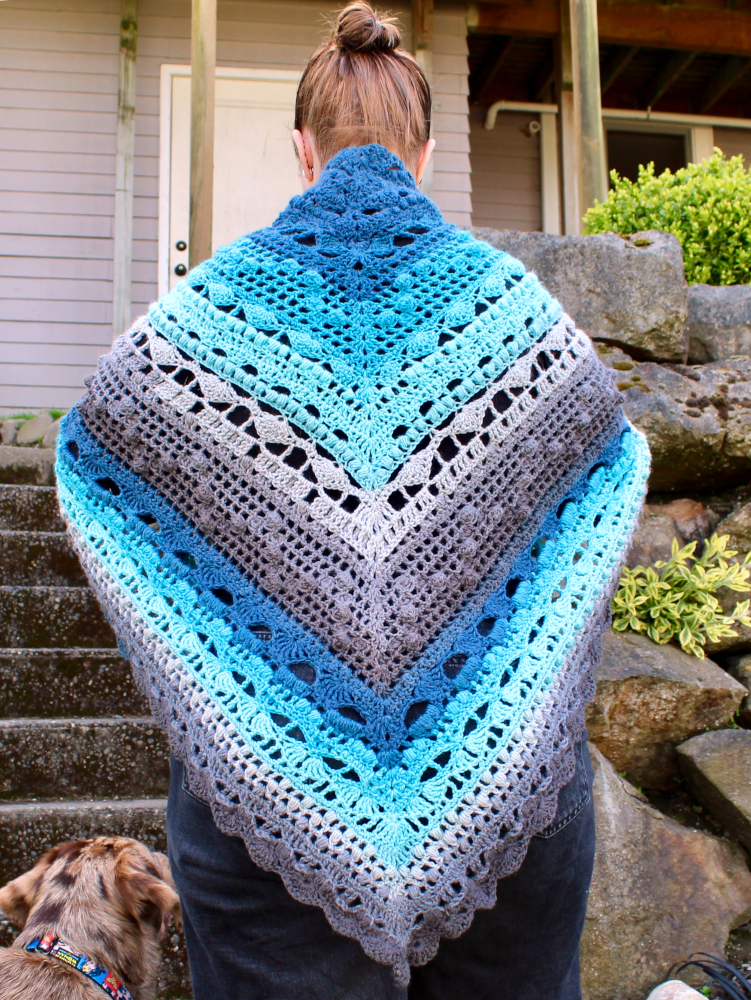
For the most part I was super happy with the yarn I used. It didn’t become ‘fuzzy’ even after ripping out and crocheting repeatedly, and the colors were beautiful. Each skein had 1 complete repeat of the colors so they were easy to cut apart and match up when changing over.
My only complaint is that inside the second skein, there was a tiny knot tying two completely different shades of blue together. I’m used to yarn having a small knot in it, but I am not pleased with the color change. I ended up cutting it apart and was able to match up the colors, but it’s not ideal.
However, I’d still recommend using Lion Brand Mandala for this shawl. It has good drape and stitch definition. I also think that the length of each color in two skeins creates a very nice gradient.
Click here to purchase this pattern in UK and US terms for $4.99 Use code ‘autumn’ to get 20% off your total pattern purchase in my ravelry store from now until Halloween 2019! Be sure to upload a picture to Ravelry and link it to the pattern! I love seeing everyone’s creations!
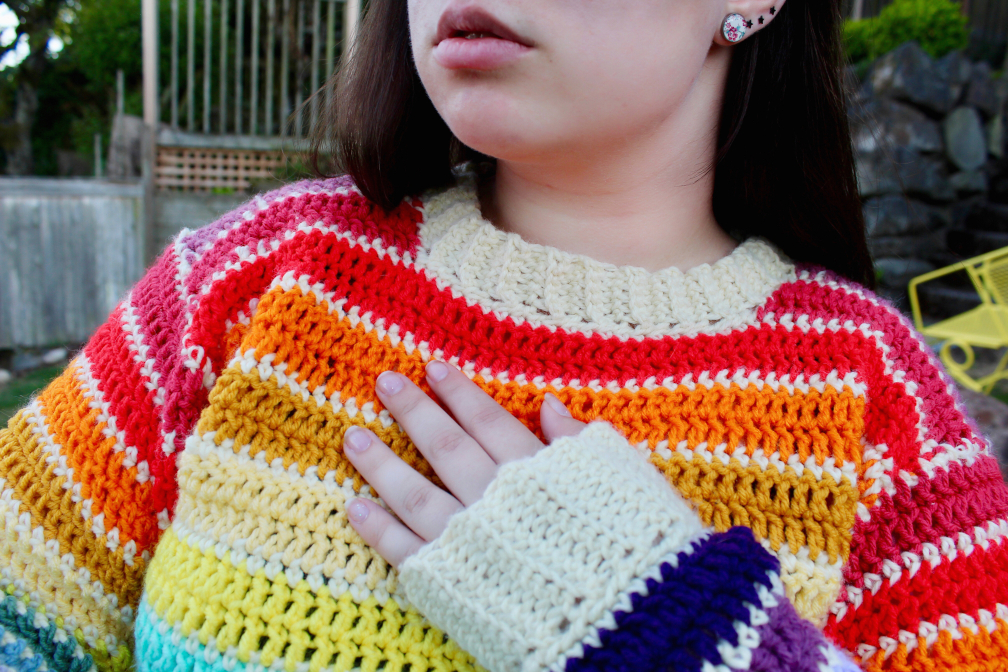
I’ve completed yet another pattern! This time I used a bunch of my leftover yarn bits and bobs to create a rainbow sweaters I have dubbed the Scrappy Stripes Sweater! This pattern is available as a free downloadable pdf on Ravelry.
The sweater body is worked from the bottom up, while the sleeves are worked from the top down. Each colored stripe only uses about 80 yards of each scrap, and about 440 yards of a base color, in my case I used cream. This brings the total amount of yarn to about 1720 yards.
If you’ve got sharp eyes, you might notice some yarns that I have used in previous projects! The sweater is primarily made from aran weight yarn, but there are a couple dk and worsted bits snuck in there, with careful consideration as to how that would affect the gauge.
The sweater is made from dc and sc, the cuffs using the back loop only to create texture and stretch, while the sleeves use dc2tog for shape. The stripes keep their clean look using the standing crochet stitch. If you’re unfamiliar with what that is, I’d recommend checking out this tutorial on Moogly.
Although the weather is a bit warm for this scrappy sweater, I still want to wear it all the time! It was fun to use up the ends of yarn and think about other projects I had made using it.
The pattern is available for free download here. I listed all the yarns I can remember here, but I can’t guarantee the one you’re eyeing is listed. Remember to let me know if you make something using this pattern! You can link it to the project page on Ravelry, or tag me on social media.
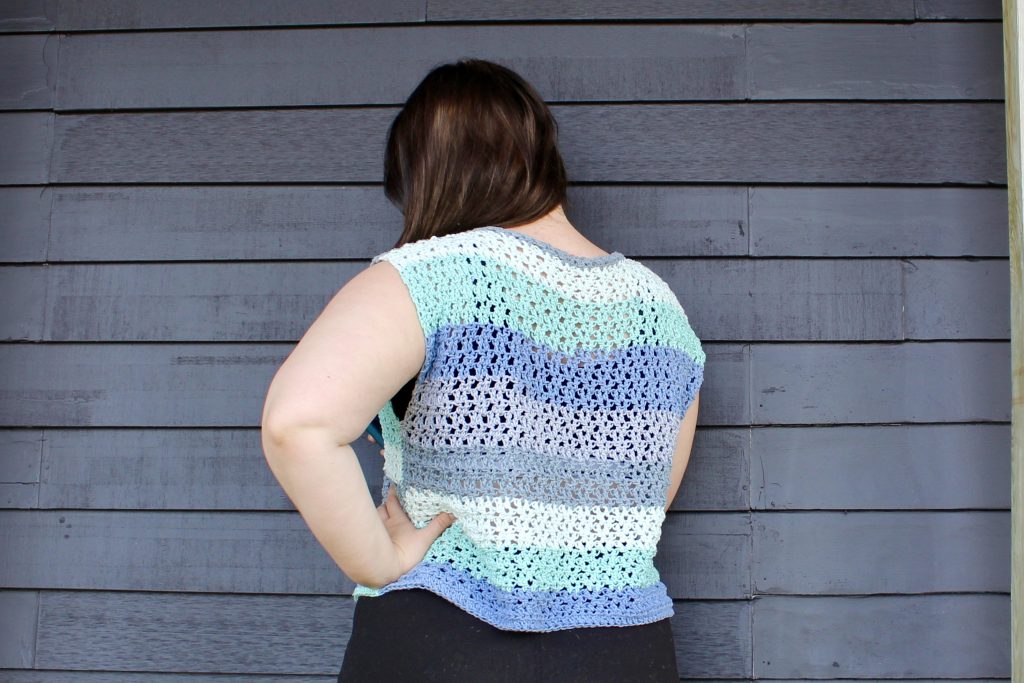
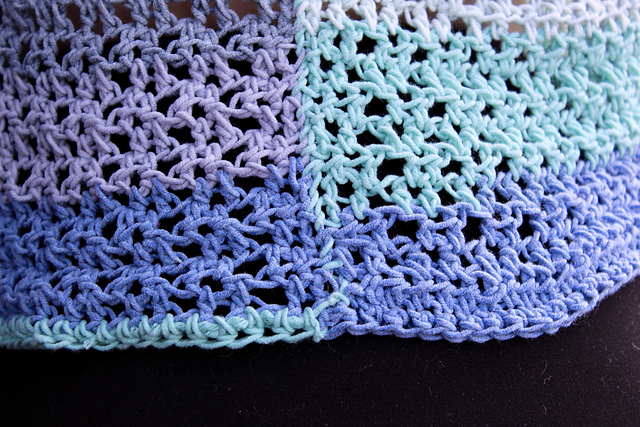
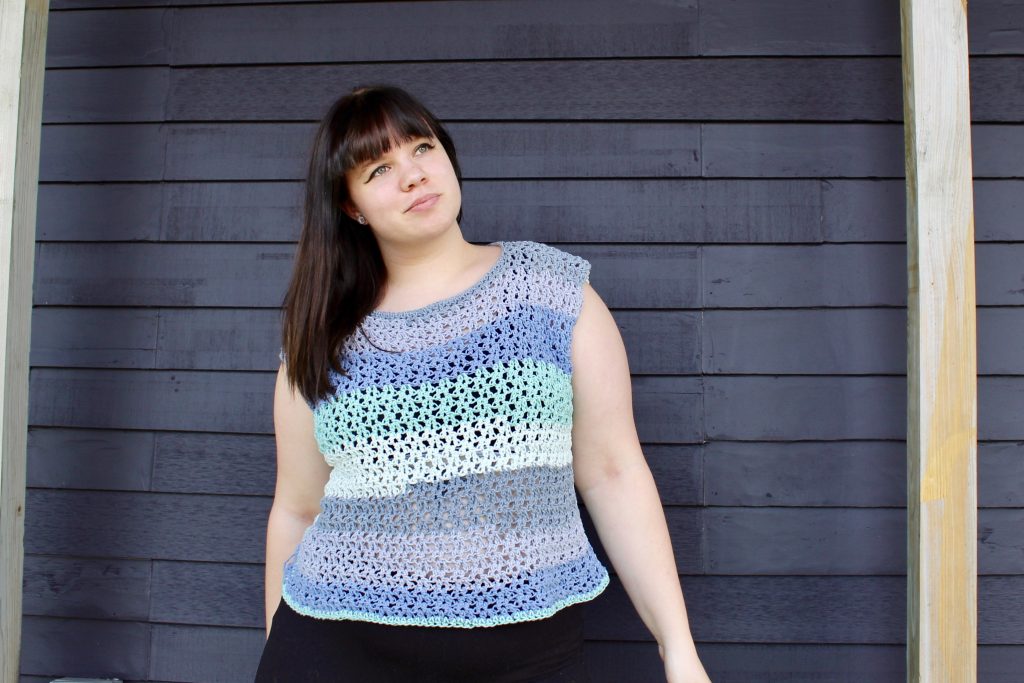
I’ve just released a new pattern for sale on Ravelry! The Tanabota Top comes in sizes XS-XXL, fitting a bust range of 32-49 inches. It uses a size L/8mm crochet hook and worsted weight yarn. It’s the perfect top for summer – it’s sleeveless with an open, light stitch pattern. The patterns is also fairly easy to make, using only half double crochet, chain stitch, and slip stitch.
The yarn I used is Caron Cotton Cake in Hydrangea. It’s an easy to work with yarn with good stitch definition. However, the 530 yard ball I used had eight knots tying ends together in it. I’ve never come across a yarn with so many knots in it, but the colors are so pretty I didn’t mind too much.
The Tanabota Top is worked in one piece from front to back with side seams. Here’s a close up of the join between the front and back along the sides, joined with a whipstitch. I was a bit worried with the color changing properties of the yarn that my stitches might look out of place, but it blended in rather well, I think.
This pattern is currently available on Ravelry for $2.99. If you’re interested in this pattern, please check it out or click here to buy it now! Be sure to share pictures of what you make, I love to see what everyone comes up with!
I was recently asked to make Razor’s Hat from the Doctor Who episode World Enough and Time. I wrote up a pattern just in case anyone else was interested in making one for themself!
What you’ll need:
US size 6 needles (4.0 mm)
Double knit yarn
I used Stylecraft Special DK in Dark Brown Shade 1004
I found that if you want to make your hat distressed in a similar way to the show, it is easier to prevent unraveling if you create the distressing as you go. I’ve included two versions of the hat, one with distressing and one without.
The hat sits very different just from folding the brim!
Unfamiliar terms explained:
DSPU: drop stitch and pull out stitches all the way to the brim, pick up a stitch on your left needle, ready to be worked as the next stitch
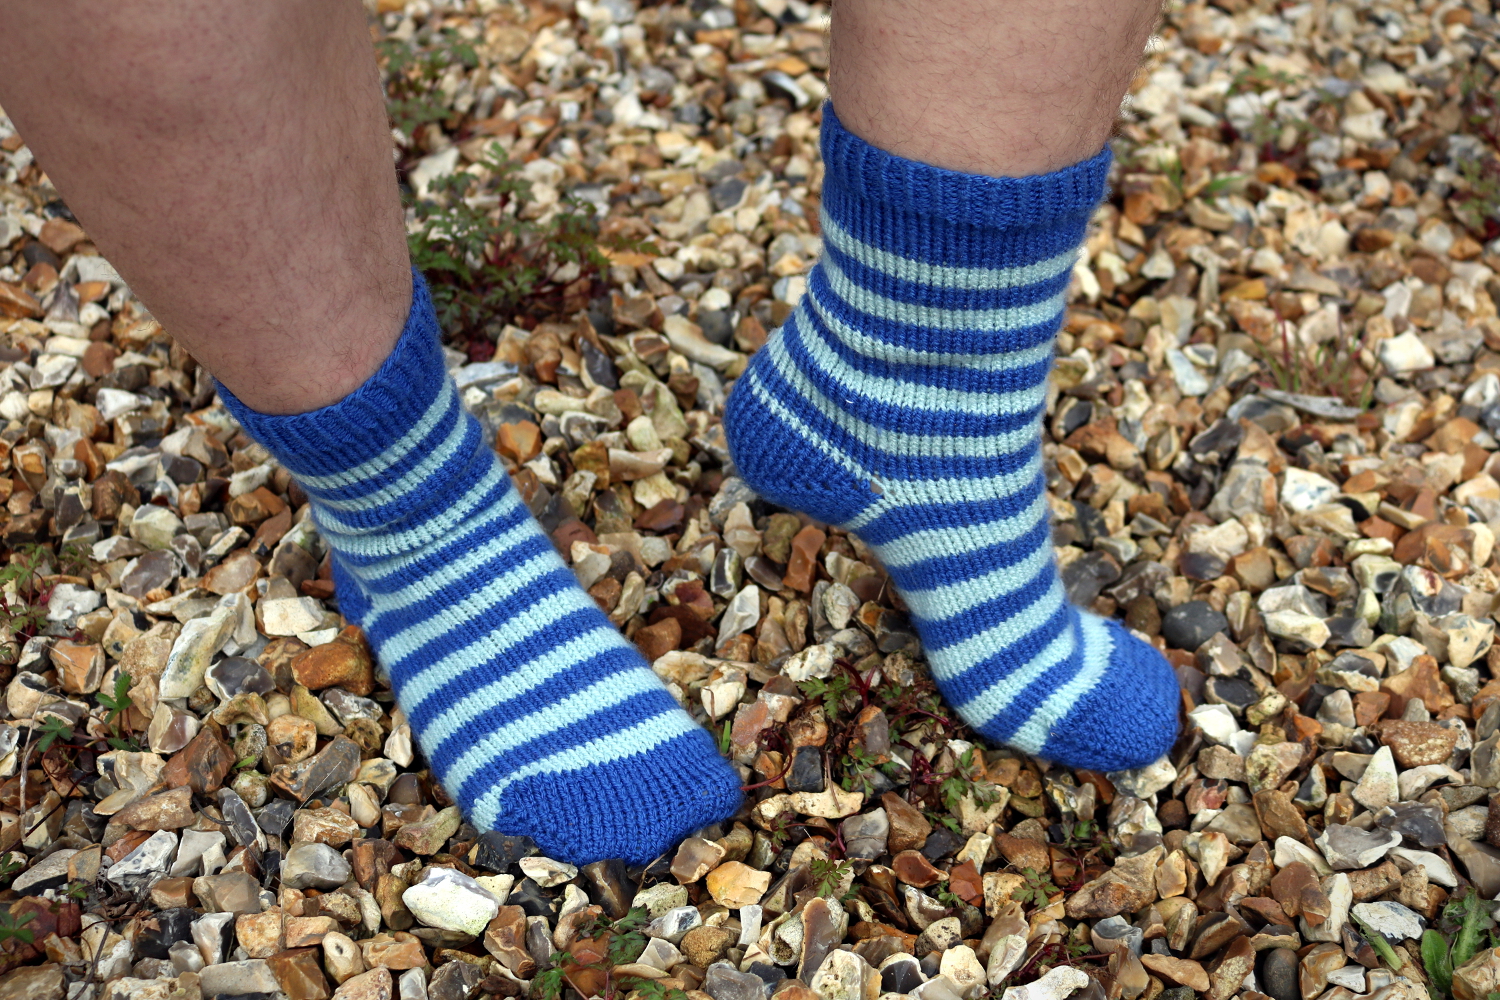
These socks were super fun to make, so I wrote up the pattern and made a video tutorial! Let me know what you think, and be sure to let me know if you make a pair!
Materials:
Special Stylecraft Double Knit in Lapis
Special Stylecraft Double Knit in Duck Egg
3.25 mm Knitting Needles (US3/UK11)
Pattern:
Cast on 60 stitches in Dark Blue
K1P1 all the way around for 8 rows
K all the way around for 8 rows
*Switch to Light Blue, K all the way around for 4 rows
Switch to Dark Blue, K ass the way around for 4 rows
Repeat from * four times, making a total of 5 Dark Blue and 5 Light Blue stripes
Switch to Light Blue, K all the way around for one and a half rows
Shift needles so that you can start the heel from the center back of the work
HEEL & TOE
K 15 stitches, turn
Row 1: sl st, P29, turn
Row 2: sl st, K28, turn
Row 3: sl st, P27, turn
Row 4: sl st, K26, turn
Row 5: sl st, P25, turn
Row 6: sl st, K24, turn
Row 7: sl st, P23, turn
Row 8: sl st, K22, turn
Row 9: sl st, P21, turn
Row 10: sl st, K20, turn
Row 11: sl st, P19, turn
Row 12: sl st, K18, turn
Row 13: sl st, P17, turn
Row 14: sl st, K16, turn
Row 15: sl st, P15, turn
Row 16: sl st, K14, pick up stitch from between previous worked stitch and next stitch on left needle (denoted as m1), k2tog, turn
Row 17: P15, m1, p2tog, turn
Row 18: K16, m1, k2tog, turn
Row 19: P17, m1, p2tog, turn
Row 20: K18, m1, k2tog, turn
Row 21: P19, m1, p2tog, turn
Row 22: K20, m1, k2tog, turn
Row 23: P21, m1, p2tog, turn
Row 24: K22, m1, k2tog, turn
Row 25: P23, m1, p2tog, turn
Row 26: K24, m1, k2tog, turn
Row 27: P25, m1, p2tog, turn
Row 28: K26, m1, k2tog, turn
Row 29: P27, m1, p2tog, turn
Row 30: K28, m1, k2tog, turn
Row 31: P29, m1, p2tog, turn
HEEL ONLY
Row 32: K 15
Adjust stitches so that you can continue working with your Light Blue yarn where you left off. Complete that row in knit stitch, and then do two more rows of knit stitch in Light Blue.
*Switch to Dark Blue, K all the way around for 4 rows
Switch to Light Blue, P all the way around for 4 rows
Repeat from * until your sock is the right length for your foot.
For reference, I had a total of 5 Dark Blue and 5 Light Blue stripes for my UK size 5 feet.
Refer back to the heel instructions and work the toe the same as the heel.
Complete the sock with kitchener stitch and weave in your ends.
Tada! You now have your own pair of 13th Doctor Socks!
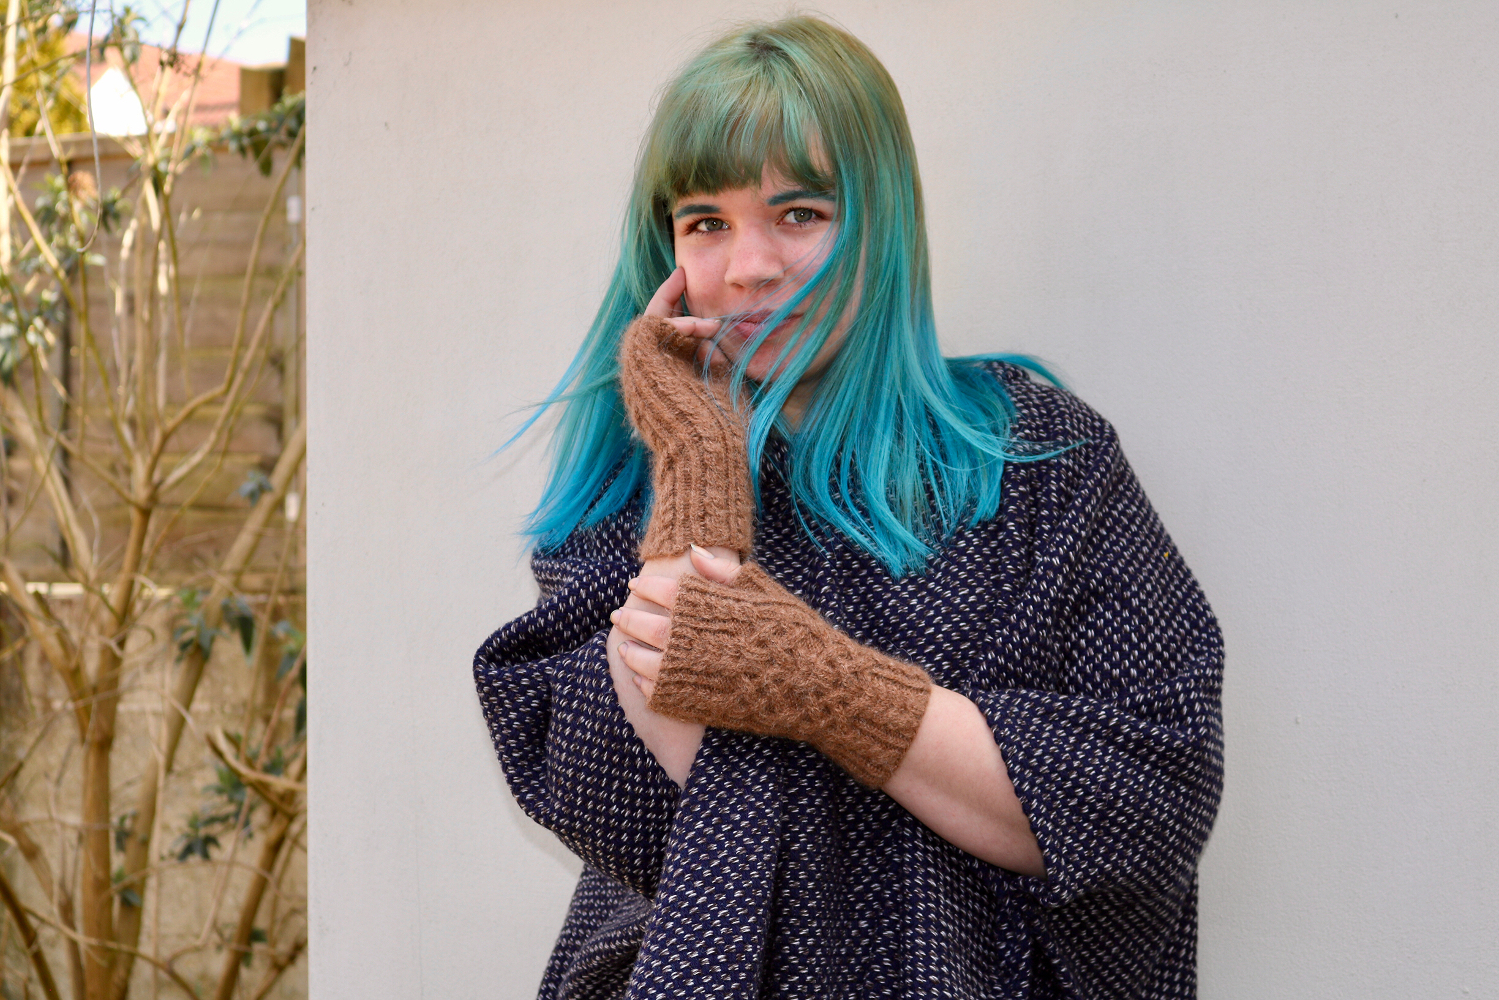
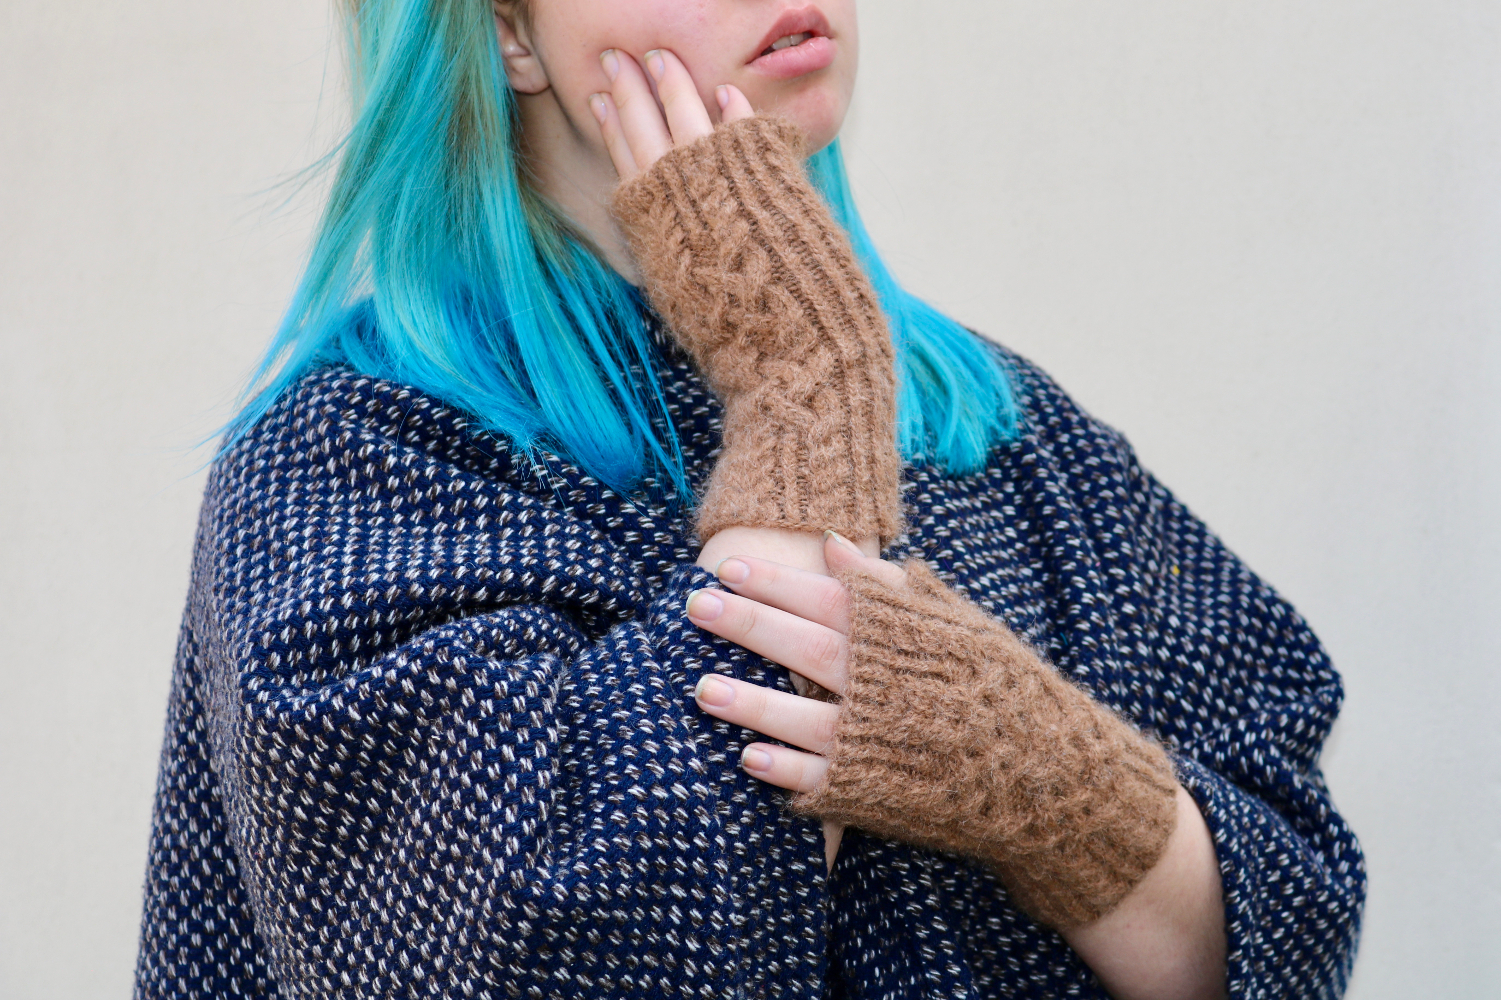
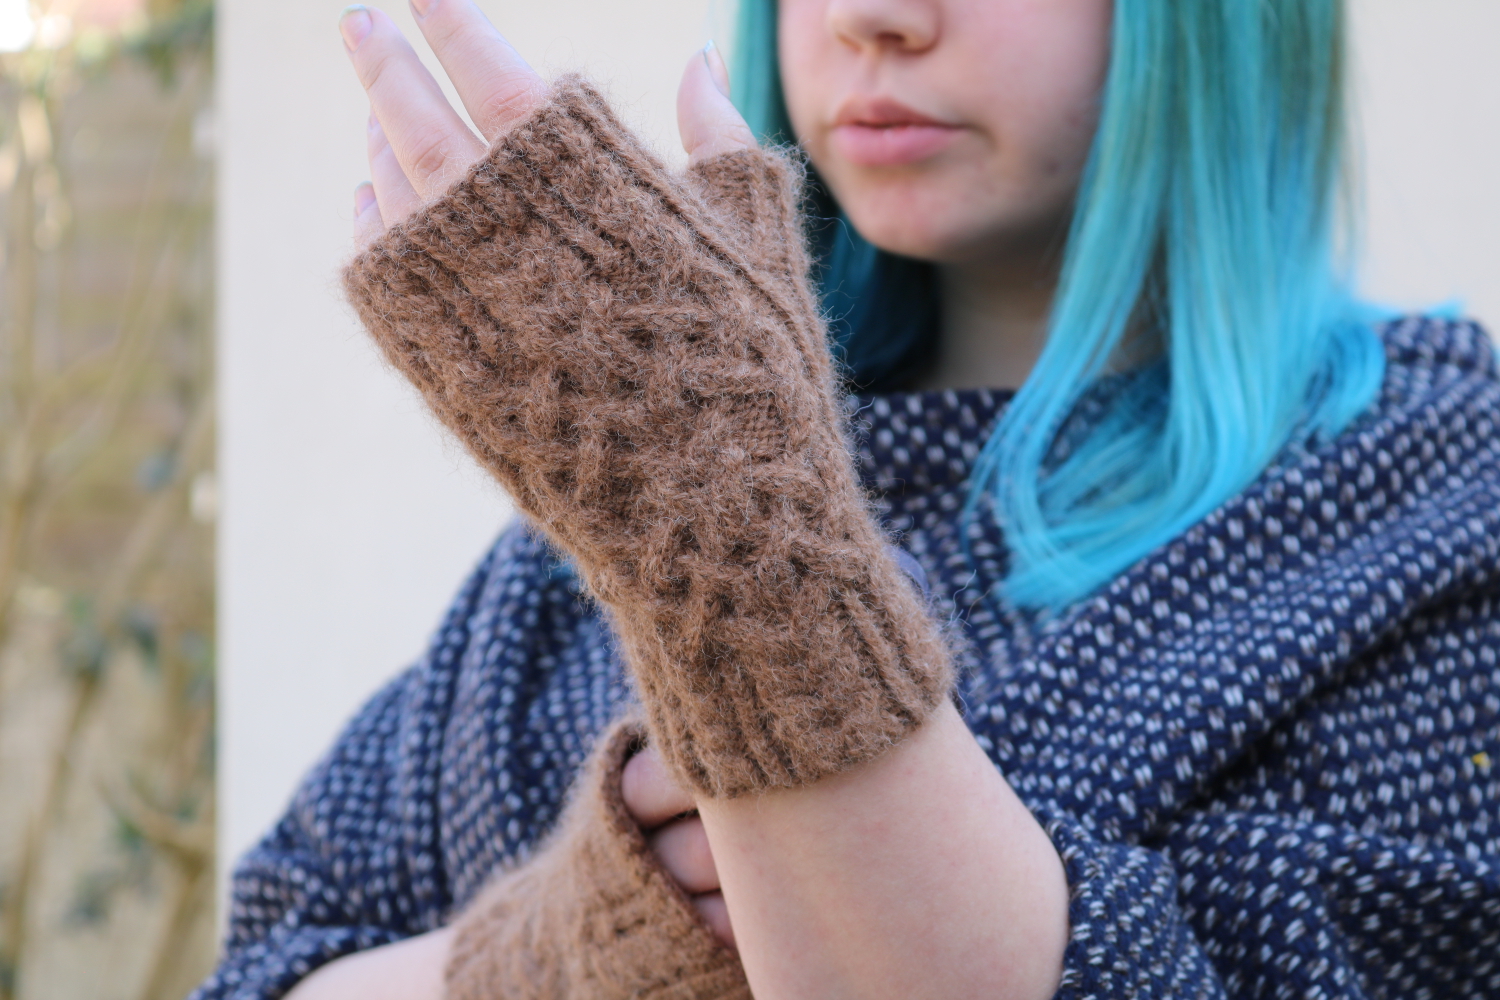
When I first saw this lovely brown yarn, I knew immediately that I wanted to make some sort of glove or mitten for myself from them. My aunt got the yarn from a place called Pacesetter Alpacas in Beloit, Wisconsin. It’s a wonderfully soft yarn, and I actually got to meet the alpaca from which the wool was collected! I unfortunately lost the label for this yarn, but if I remember correctly, it was a blend of two different kinds of alpacas.Because this yarn was so nice, I wanted to pick the perfect pattern. After much searching, I settled on the Homeward Bound Mitts. The cables on the backs of these mittens caught my eye immediately. I hadn’t knit anything with particularly complicated cables before and this looked like a good way to challenge myself.
I made these mittens for myself in size 1 using 3.25 mm/US size 3/UK size 10 DPNs. Because I wasn’t planning on switching needles between the wrist and hand of the glove I chose a size between the two recommended in the pattern. I was a little concerned that they wouldn’t fit properly, but it turned out fine By mistake, I left off the rib on the bottom of the mittens, but I don’t think it’s too noticeable. The pattern for these mittens was really well written, and included charts for all the cabling sections. I had never made a thumb before, and this pattern described how to knit one well enough that I made almost no mistakes! I love these mittens, and I’m almost tempted to make myself a pair in every color.


 The pattern for these mittens was really well written, and included charts for all the cabling sections. I had never made a thumb before, and this pattern described how to knit one well enough that I made almost no mistakes! I love these mittens, and I’m almost tempted to make myself a pair in every color.