13th Doctor Striped Socks

These socks were super fun to make, so I wrote up the pattern and made a video tutorial! Let me know what you think, and be sure to let me know if you make a pair!

Materials:

Special Stylecraft Double Knit in Lapis
Special Stylecraft Double Knit in Duck Egg
3.25 mm Knitting Needles (US3/UK11)

Pattern:

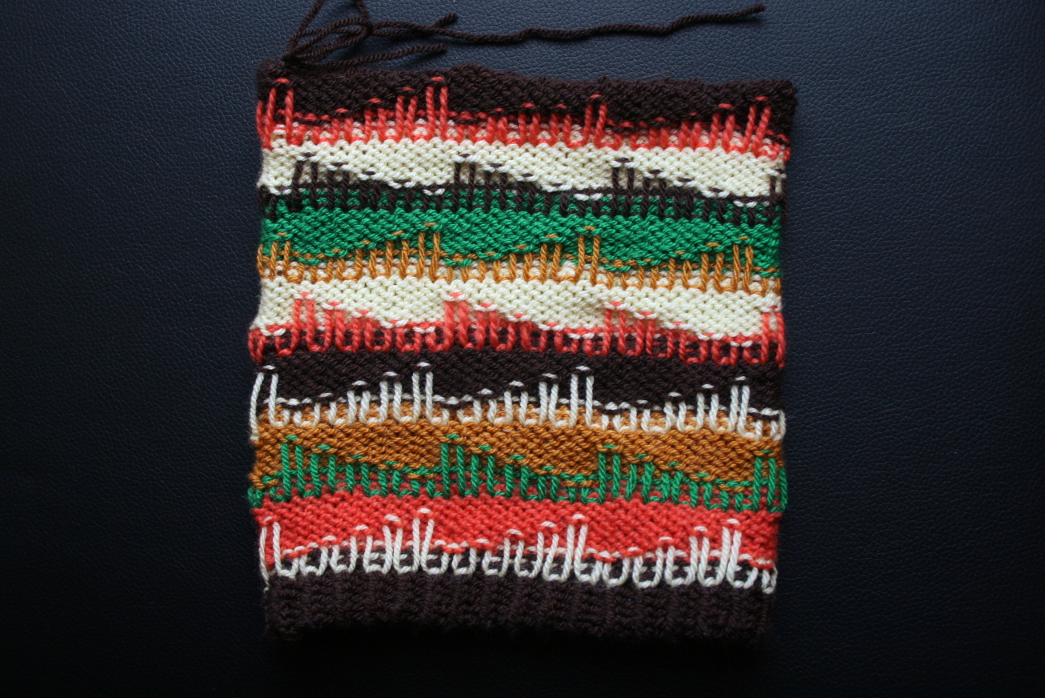
Cast on 60 stitches in Dark Blue
K1P1 all the way around for 8 rows
K all the way around for 8 rows
*Switch to Light Blue, K all the way around for 4 rows
Switch to Dark Blue, K ass the way around for 4 rows
Repeat from * four times, making a total of 5 Dark Blue and 5 Light Blue stripes
Switch to Light Blue, K all the way around for one and a half rows
Shift needles so that you can start the heel from the center back of the work
HEEL & TOE
K 15 stitches, turn
Row 1: sl st, P29, turn
Row 2: sl st, K28, turn
Row 3: sl st, P27, turn
Row 4: sl st, K26, turn
Row 5: sl st, P25, turn
Row 6: sl st, K24, turn
Row 7: sl st, P23, turn
Row 8: sl st, K22, turn
Row 9: sl st, P21, turn
Row 10: sl st, K20, turn
Row 11: sl st, P19, turn
Row 12: sl st, K18, turn
Row 13: sl st, P17, turn
Row 14: sl st, K16, turn
Row 15: sl st, P15, turn
Row 16: sl st, K14, pick up stitch from between previous worked stitch and next stitch on left needle (denoted as m1), k2tog, turn
Row 17: P15, m1, p2tog, turn
Row 18: K16, m1, k2tog, turn
Row 19:  P17, m1, p2tog, turn
Row 20: K18, m1, k2tog, turn
Row 21: P19, m1, p2tog, turn
Row 22: K20, m1, k2tog, turn
Row 23: P21, m1, p2tog, turn
Row 24: K22, m1, k2tog, turn
Row 25: P23, m1, p2tog, turn
Row 26: K24, m1, k2tog, turn
Row 27: P25, m1, p2tog, turn
Row 28: K26, m1, k2tog, turn
Row 29: P27, m1, p2tog, turn
Row 30: K28, m1, k2tog, turn
Row 31: P29, m1, p2tog, turn
HEEL ONLY
Row 32: K 15
Adjust stitches so that you can continue working with your Light Blue yarn where you left off. Complete that row in knit stitch, and then do two more rows of knit stitch in Light Blue.
*Switch to Dark Blue, K all the way around for 4 rows
Switch to Light Blue, P all the way around for 4 rows
Repeat from * until your sock is the right length for your foot.
For reference, I had a total of 5 Dark Blue and 5 Light Blue stripes for my UK size 5 feet.
Refer back to the heel instructions and work the toe the same as the heel.
Complete the sock with kitchener stitch and weave in your ends.

13th Doctor Socks
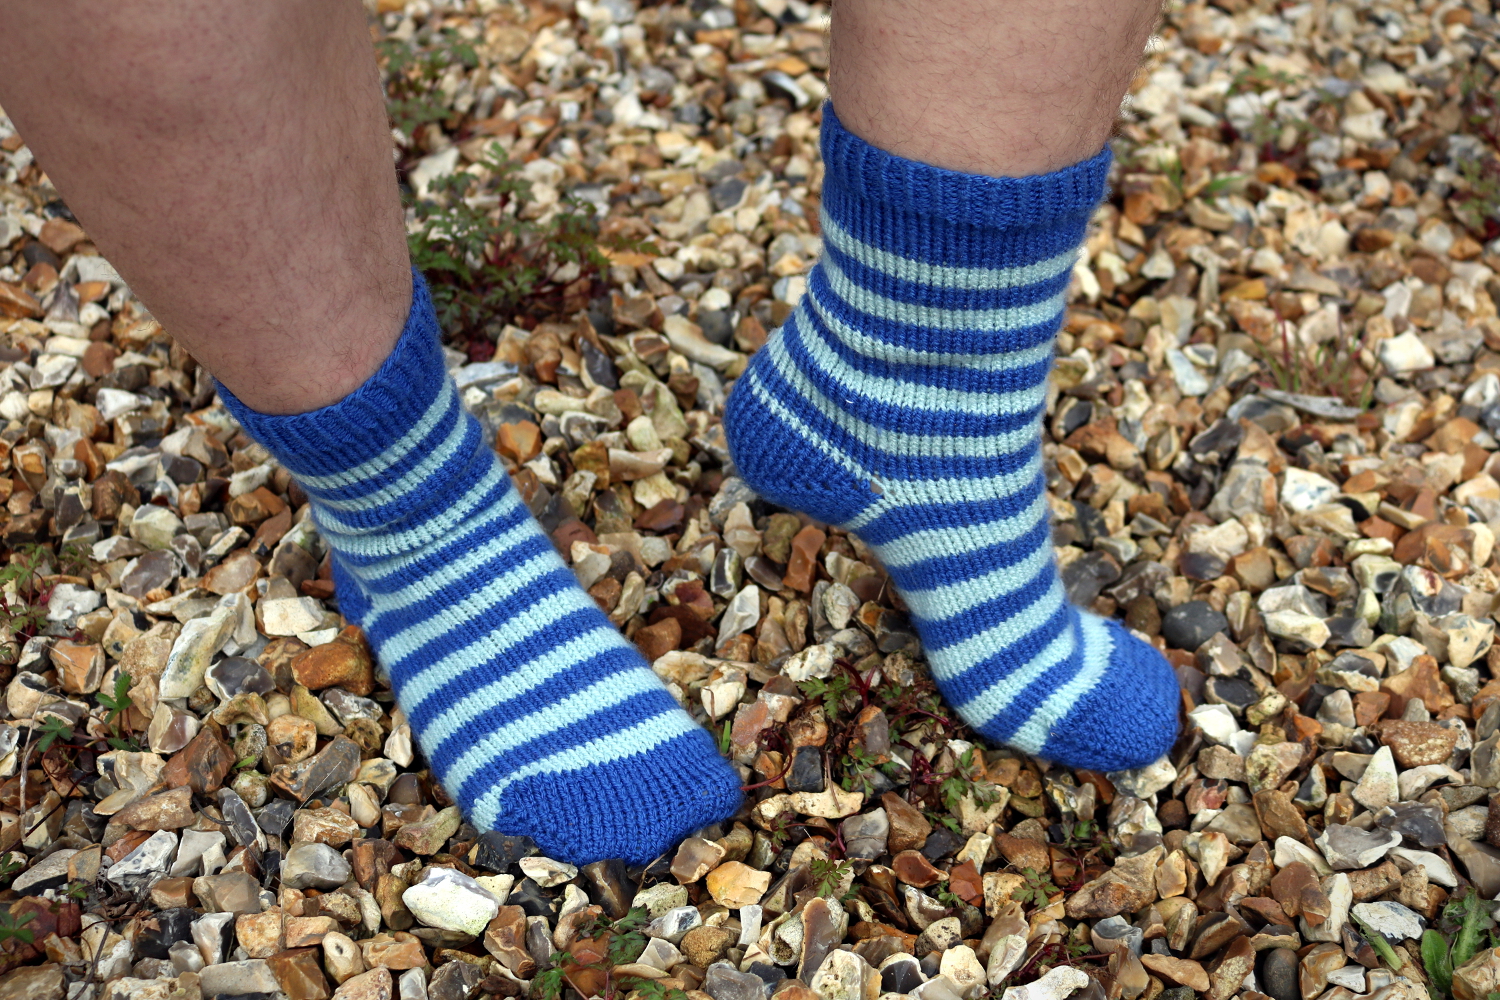
Tada! You now have your own pair of 13th Doctor Socks!

Star Butterfly

There was a huge Disney meet on the third day of London MCM, which I went to dressed as Star Butterfly. Star Butterfly is a character from the Disney show Star vs the Forces of Evil.

Star Butterfly FullFor this cosplay, I made the dress and the headband, painted the shoes, and styled the wig. Making the dress was much more of a pain than I originally thought it would be. I had to shape the front of the dress by curving each of the front stripe pieces just right, but I had a lot of trouble doing this. I finally got the shape of the front right and attached to the back, when I discovered I’d somehow made the front piece much wider than the back piece. The bodice somehow still fit, but the front panel wrapped around further than I wanted it to. The skirt went on with little fuss, although I did somehow catch extra fabric in the hem a few times. I lined the bodice of the dress with darted teal fabric – I wasn’t about to try and stripe the inside too!

Star Butterfly Wig

I braided the wig during the train ride to the convention center in the hopes it wouldn’t tangle too badly before I got there.

This is the first time I’ve properly styled a wig for a cosplay. I styled it using craft glue, which meant the front of the wig didn’t move at all during the day. The headband was made by hot gluing fabric over an alice band, then hot gluing stuffing filled fabric horns onto that.

The shoes I painted with multiple layers of acrylic paint to match Star’s shoes in the show. In the show she wears rabbit faced boots instead, but I had to work with what I had. I also sewed, painted, and glued on little rabbit ears to the shoes, but those fell off very quickly. The paint on the rubber soles of the shoes scraped off pretty quickly. I unfortunately didn’t think to take pictures of the shoes before the convention.

Costume Crew Halloween

Back row: Em, Dina, Tilly, Phoebe, Maika, Kris; Front row: Katie, Ruth, Scott, Nicole, Me; Photo taken by Jay

This cosplay was so cute I ended up wearing it for Halloween! Since I’m on a costume course, many people wore really, really good costumes. This costume was lots of fun, and I plan on wearing the dress again as normal clothing.

Nardole’s Hat from The Eaters of Light

This is my version of the hat that Nardole wears in the Doctor Who episode The Eaters of Light. When this episode aired last week, I immediately knew that I needed to make his hat. It was fairly simple to make, and I’ll share my process so that anyone who wants one can make one too.

nardole's hat pulled over face

This is how you wear a hat, right?

What you’ll need:

  • US size 8 needles (5mm)
  • Double knit or worsted weight yarn
  • Special Stylecraft DK in Lemon Shade 1020
  • Special Stylecraft DK in Dark Brown Shade 1004
  • Special Stylecraft DK in Green 1116
  • Special Stylecraft DK in Camel 1420
  • Special Stylecraft DK in Spice 1711

Cast on 70 stitches in the round in dark brown (must be a multiple of 10)

Rows 1-13: k1, p1 all the way around

Row 14: fold the brim to the inside of the hat attach to previous row with k1, p1

From here on, the every row is purled. (The design is worked on top after completion)

1 row in lemon, 7 rows in spice,
1 row in green, 7 rows in camel,
1 row in lemon, 7 rows in dark brown,
1 row in spice, 7 rows in lemon,
1 row in camel, 7 rows in green,
1 row in dark brown, 7 rows in lemon,
1 row in spice, 7 rows in dark brown.

On the last row, pull a piece of yarn through all of the stitches. Do not gather it yet, it is easier to work in the design beforehand.

inside of nardole's hat

Interior of the unfinished hat

The design on top is made by weaving pieces of yarn that are the same color as the single rows. They are woven around the knit stitch below this row and brought up to the stripe above at varying heights. This is difficult for me to explain, but I hope the pictures are good enough to understand what I mean. After making the design, tighten the yarn you previously pulled through the top row of stitches and secure. Make a large pom pom out of the dark brown yarn and attach it to the top.

If anyone does make this hat, be sure to let me know!

side of nardole's hat ii

Since it’s summer, I doubt I’ll be wearing the hat any time soon. As soon as cold weather hits, though, I’ll be wearing it all the time!

Doctor Who – The Fourth Doctor

Last weekend was London MCM 2017! I went all three days and had a fantastic time. I didn’t cosplay the first day, but I wore my french fry dress and got a surprising amount of complements as well as a photo request! If I am able to track down the photo, I’ll be sure to share it here!
tumblr_oqs37rABJI1ustsfxo8_1280

On the second day of MCM, I dressed as the fourth regeneration of the Doctor from Doctor Who.

Yes, those leaves are actually that size! Photo taken by: Alice the Insane

Most of the outfit is store bought, but I made both the scarf and the skirt. I knitted the scarf in fifty hours over the course of 5 months, starting on the first of January and finishing just last week on the 6th. My research for the scarf design was a combination of this site and meticulous combing through yarn websites. The scarf is a replica of the scarf worn by Tom Baker in the first half of season 12 of Doctor Who. I think I was able to find a very good color match with the yarn. It took a bit longer to make than I thought it would, and I made a few tiny mistakes, but I am very happy with it. I made it using US size 8 knitting needles.

Photo taken by: Alice the Insane

The skirt is actually one I made for my costume course at uni. It’s an Edwardian skirt with center back snaps and hook and eyes. I did a very good job of pattern matching each seam, which is especially evident in the back panel. The synthetic plaid fabric is backed on a black cotton, and every seam is piped with the same black cotton.

From left to right: 1 (Lee), 2, 3 (Lucas Hayes), 4 (me!), 5, 7, 8 (Reuben Roper), 9 (Dominic Murphy), 10 (James Sutton), 11 (Jamie Eve), 12 (Joshua Thunig)

I met many lovely people at the Doctor Who meet up, but unfortunately I didn’t take many pictures. I’m not really sure who took the above photo or who some of the people are in it, so please tell me if you know!

Photo taken by: Alice the Insane

If I end up going to LFCC this year, I’ll be wearing this cosplay on one of the days. I plan on adding a waistcoat and possibly some nice shoes to the costume before then.


Bee Skirt

bee skirt front

I made this skirt as part of a costume for a bee party I went to a few months ago. Since I haven’t been doing the best job of taking photos as soon as I make something, this post (as well as the next one) are quite late.

bee skirt back

I went on amazon and bought two meters of the cheapest black and yellow striped fabric I could find. Originally, I had intended to make a dress from Gertie’s Ultimate Dress Book, but I came across a problem when it came to the bodice. I cut the bodice out a size larger than it needed to be, but the armholes were so small I couldn’t fit my arms through them.

bee skirt side

Because I was a little pressed for time, I gave up on trying to fit the sleeves and bodice to myself and made a skirt instead. The skirt is simple, made from three rectangles: the front, back, and waistband. I zig zag stitched all the raw seams and included a side zipper.

I would like to eventually make this skirt into the dress I originally wanted. The bodice pieces only need small modifications in the shoulder and armpit area. While the pattern originally called for short sleeves, I probably won’t include them because I don’t have enough fabric left to recut them.

New Fabric Designs!

If you have a Spoonflower account and follow my account, you’ve probably noticed some new designs. I’ve been working on a fabric collection based on paint.

fabric photo bllue and black splatters

The first fabric, called Black and Blue Mirrors, is a simple black and blue repeating pattern. I created this design using acrylic paint and paper. I then scanned the painting into my computer and cleaned it up as much as I could before I ordered a yard of fabric from Spoonflower.

Why did I order a yard of fabric, you ask?
13235751_1279093012118230_1632974195_nFor a swap with Alice the Insane, of course! I gave her a yard of my design printed on cotton poplin ultra in trade for a super cute bag that she made to match our Kylo Ren and General Hux cosplays that we wore to MCM London. 

13444170_490185707847044_1883455511_n

I really like the bag she made, and I’ve been using it so much! It’s a really good size for everything I need with me on a daily basis.

13250474_1279092878784910_492591044_n I love the dress she decided to make from the fabric, I think she did an amazing job keeping the pattern intact and that having the design off center was fresh and different.

13249616_1279092972118234_616445597_nShe added bias binding to the neck edge, and the dress opens at the side with a zipper. Isn’t it lovely?

painted stripes fabric sample

This is the other fabric that I designed, also made using acrylic paint, paper, and a scanner. It’s only the second fabric in my ‘Paint’ fabric collection, and I’m hoping to add at least two more painted fabric designs over the summer.

13236295_1279093835451481_50537210_n

Be sure to check out Alice the Insane’s facebook page!

If you’re interested in purchasing either of these fabrics, they are available here.

All Grown Up Slouched Hat

file_medium2

I made this hat using the All Grown Up Striped Slouched Hat pattern. The pattern calls for the hat to be made using an aran yarn, but I used a double knit (a double knit is thinner than an aran). In order to be able to make the hat to fit my head, I only needed to change the length off the hat. I used a 5.5 mm (I) crochet hook and made the small adult size. I crocheted about 6 more rows in the stripe pattern than the pattern asked for.

The pattern was fairly easy to make, and I learned a new stitch as well as the best method (in my opinion) of making a brim. The pattern calls for the brim to be simultaneously made and attached to the hat, thus eliminating the hassle of sizing the brim to the hat and attaching it. I will definitely be using this brim method for all of my future crochet hats!

18″ Doll’s Earflap Hat

Image


This is a crochet hat pattern that I designed for my little sister’s American Girl Doll. The hat has two earflaps, and will fit nearly every 18″ doll.

Currently for sale on Ravelry for $0.85!